We were recently asked for help converting a spreadsheet calculating the commission earned from waste hauling. The commission varies depending on the distance driven and the number of transported barrels. When the user of the spreadsheet fills out the number of loaded barrels into the Barrels loaded column, the results appear in the Load pay column.
Here’s the spreadsheet in full, with sample data in the Barrels loaded column:
| Miles | Rate | Barrels loaded | Load pay |
|---|---|---|---|
| 0—8 | $2.34 | 1 | $0.47 |
| 8—15 | $2.48 | 2 | $0.99 |
| 15—20 | $2.84 | 3 | $1.70 |
| 20—25 | $3.28 | 4 | $2.62 |
| 25—30 | $3.38 | 5 | $3.38 |
| 30—35 | $3.88 | 6 | $4.66 |
| 35—40 | $3.96 | 7 | $5.54 |
| 40—45 | $4.08 | 8 | $6.53 |
| 45—50 | $4.18 | 9 | $7.52 |
| 50—60 | $4.28 | 10 | $8.56 |
| 60—70 | $4.72 | 11 | $10.38 |
| 70—80 | $5.16 | 12 | $12.38 |
| 80—90 | $5.44 | 13 | $14.14 |
| 90—100 | $5.90 | 14 | $16.52 |
| 100—110 | $6.38 | 15 | $19.14 |
| 110—120 | $6.60 | 16 | $21.12 |
The Load pay column contains formulas multiplying the values of the Rate and the Barrels loaded columns and then again by 20%.
What’s the best way of converting this spreadsheet to an app with Calcapp? We’ll explore three distinct ways in this sample app.
Run the app here. This app is available as the Sample: Hauling commission template in Calcapp Creator and you are encouraged to experiment with it as you read this blog post.
Direct conversion
The most straight-forward way of representing the spreadsheet as an app is to use a single calculation panel and one field group per row in the spreadsheet. Here’s what that looks like:
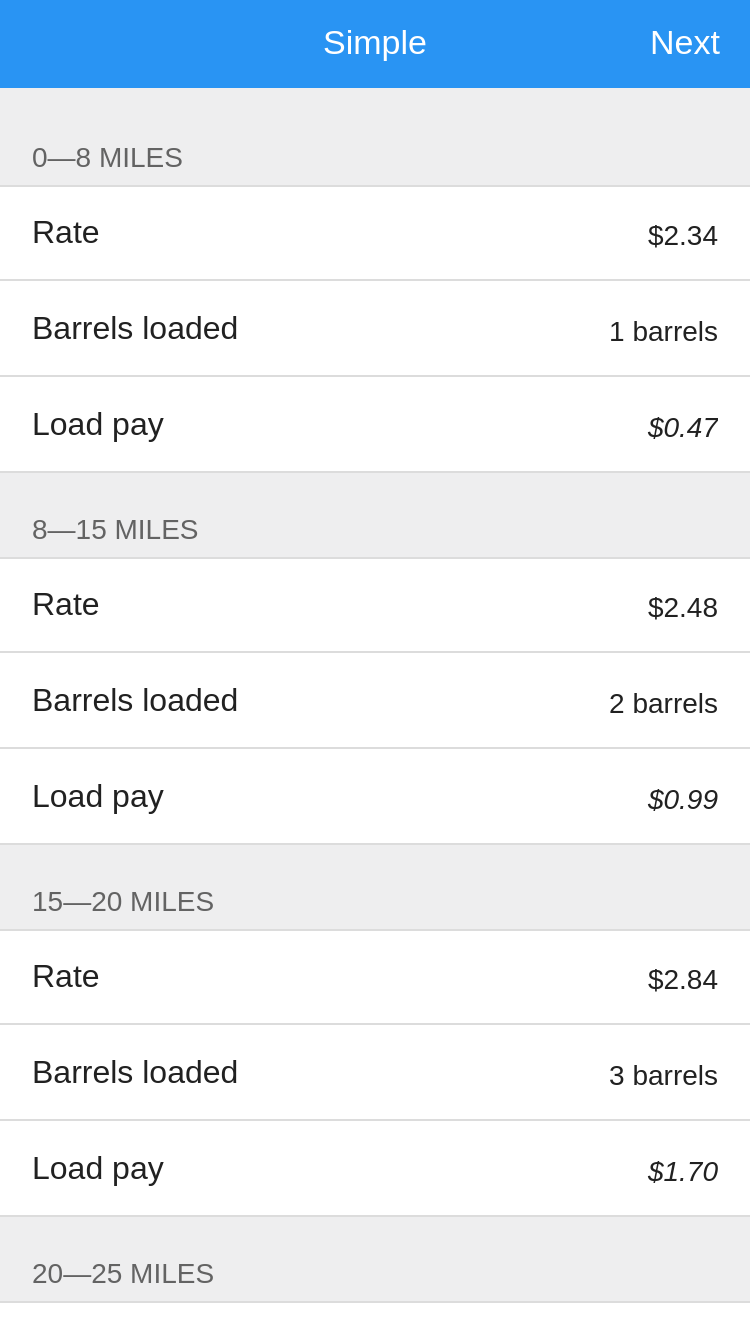
To create the app, we add a single group consisting of the three
fields Rate, Barrels loaded and
Load pay. The first two fields are input fields.
Click the $ symbol in the inspector to make the
Rate field a currency field. Type barrels into the
Barrels loaded field (to the right of the label) to
make that the unit of the field (ensuring that “ barrels” appears
after any number the user enters).
The third field is an output field with the following formula:
There are 16 rows in the spreadsheet and as a result, we need to create 16 groups. Doing that manually would be a waste of time, so we select the entire group we have created and copy it to the clipboard:
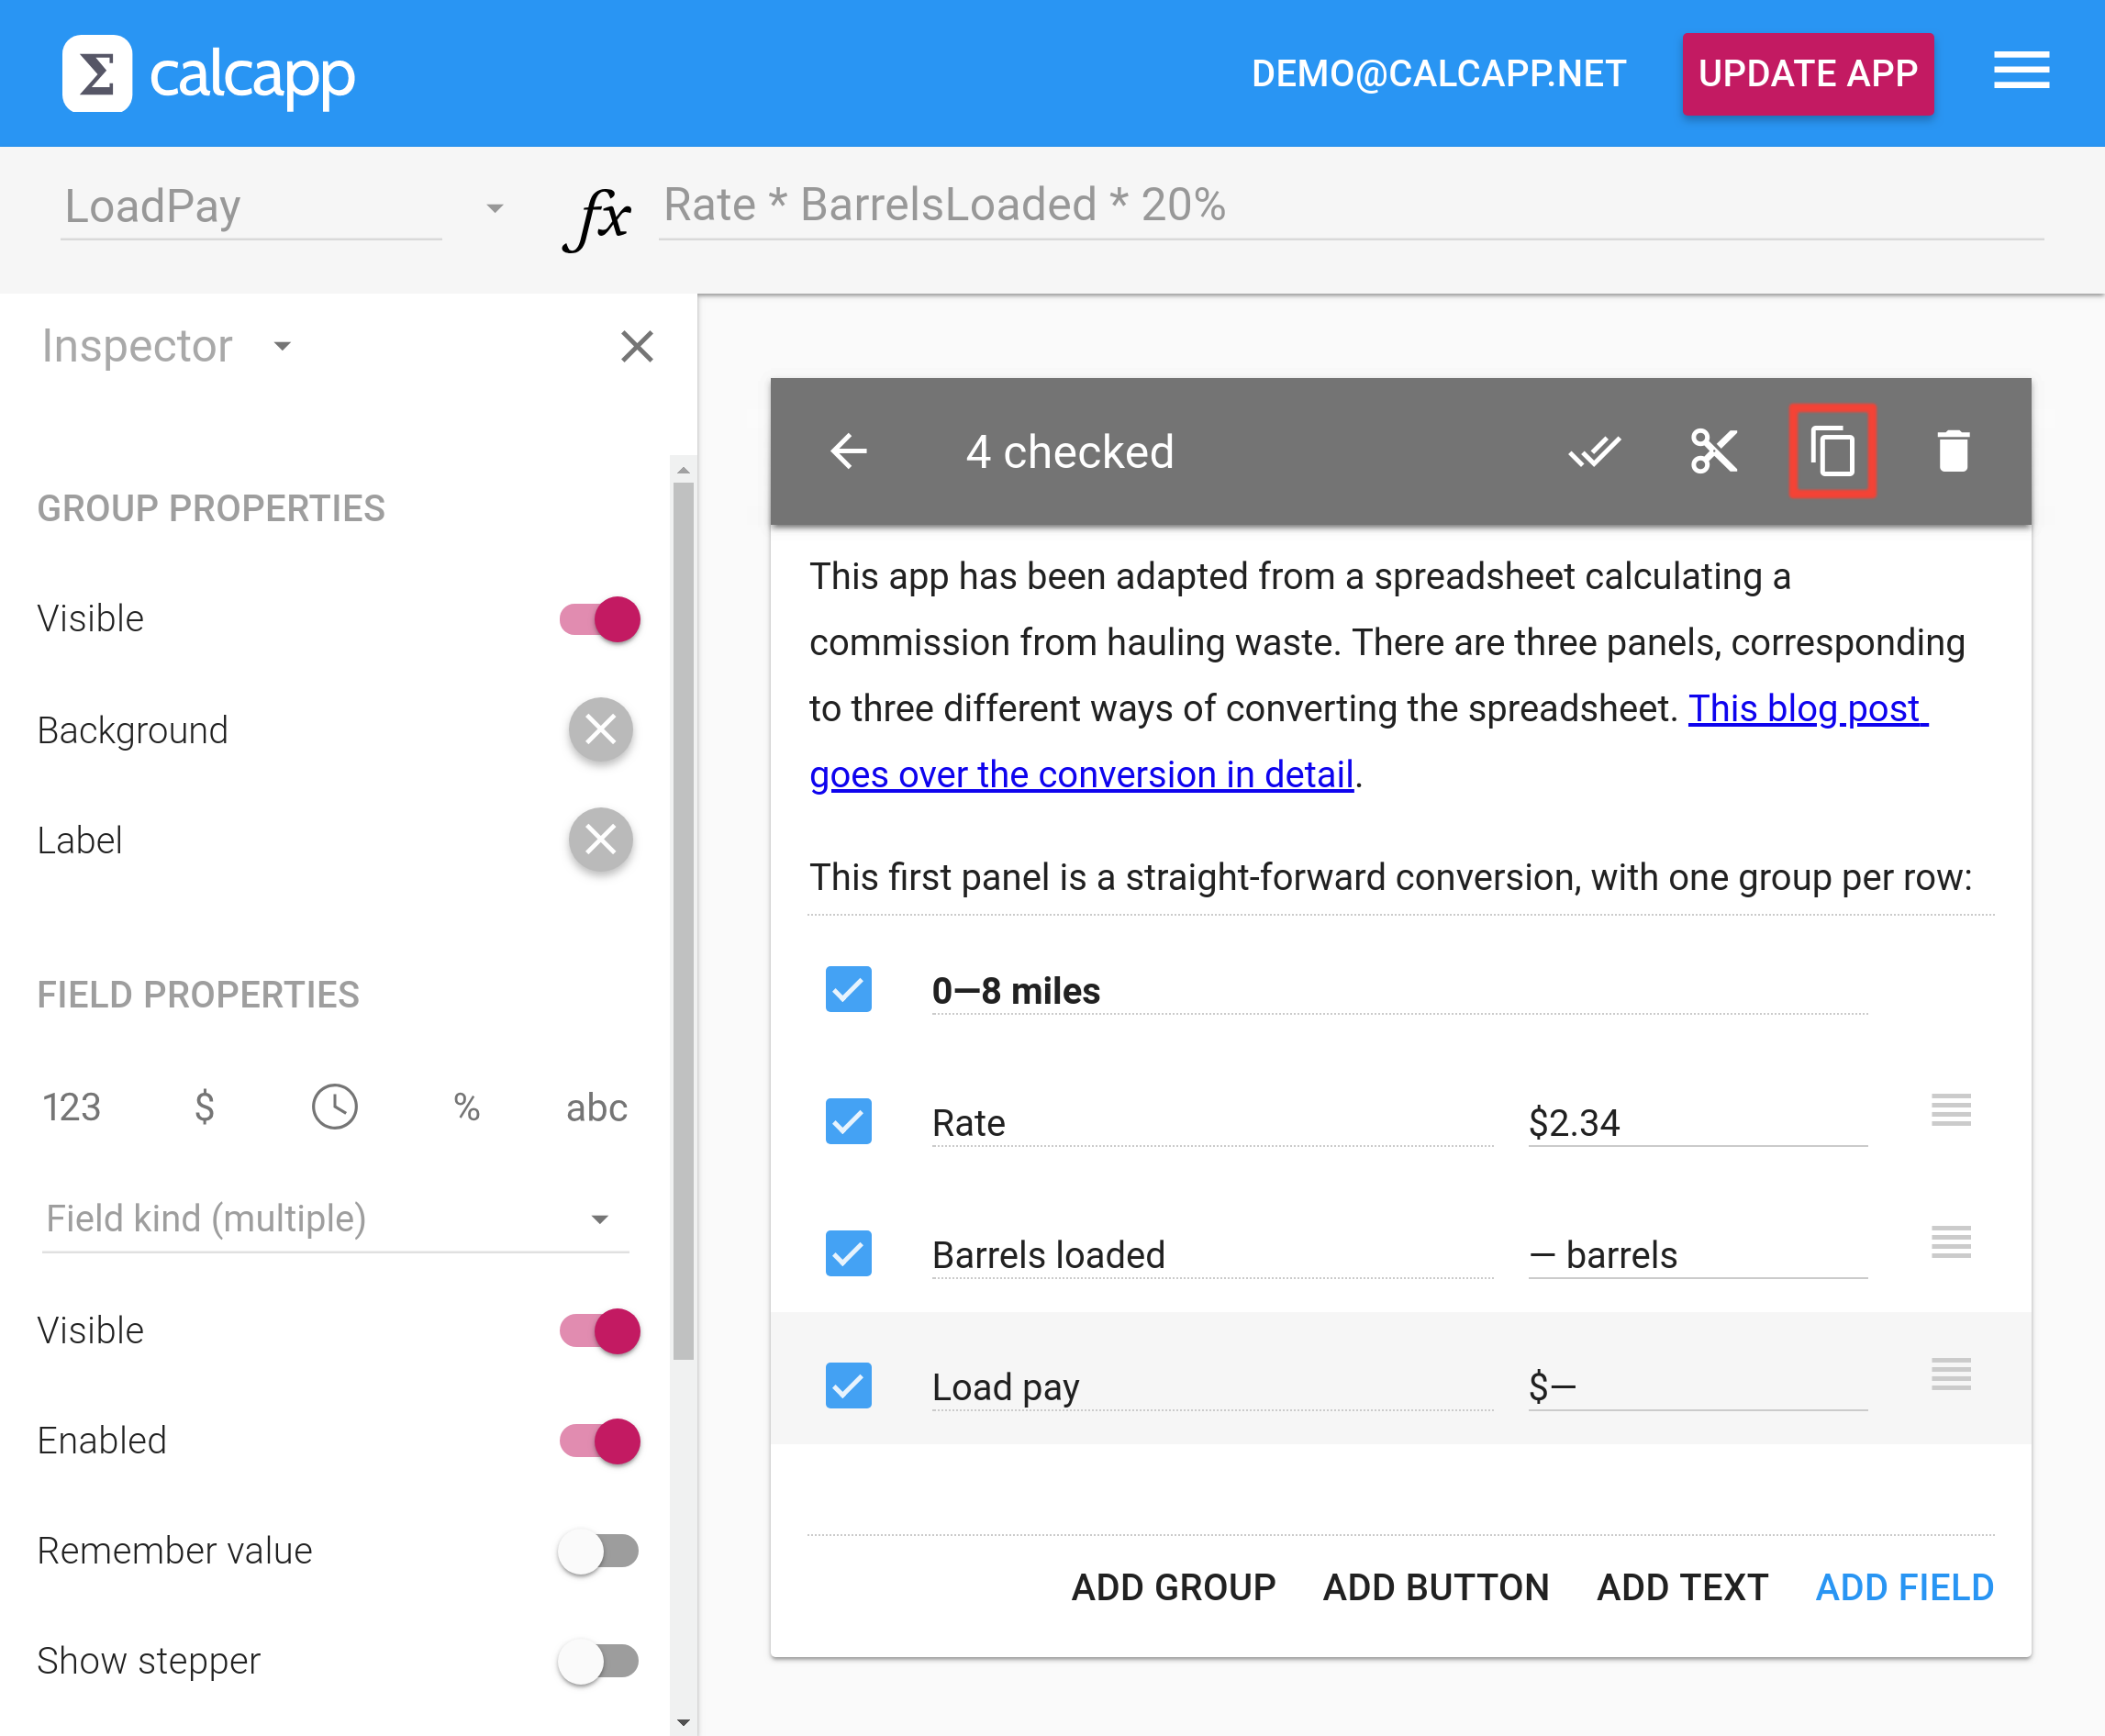
Make the last field selected by clicking it and then press the Paste button that appears after you have copied the group. Repeat another 14 times. Then, you need to go back and update the group labels and rates of every group to match the spreadsheet.
This solution is a fairly space-inefficient way of converting the spreadsheet to an app. Still, it is very faithful to the spreadsheet and is simple to create.
Using a drop-down
To make better use of the space and create a nimbler, easier-to-use app, consider using a space-saving drop-down field and a single calculation panel group with only four fields. Instead of selecting the distance by choosing a group to work with, the user selects a distance from the drop-down menu:
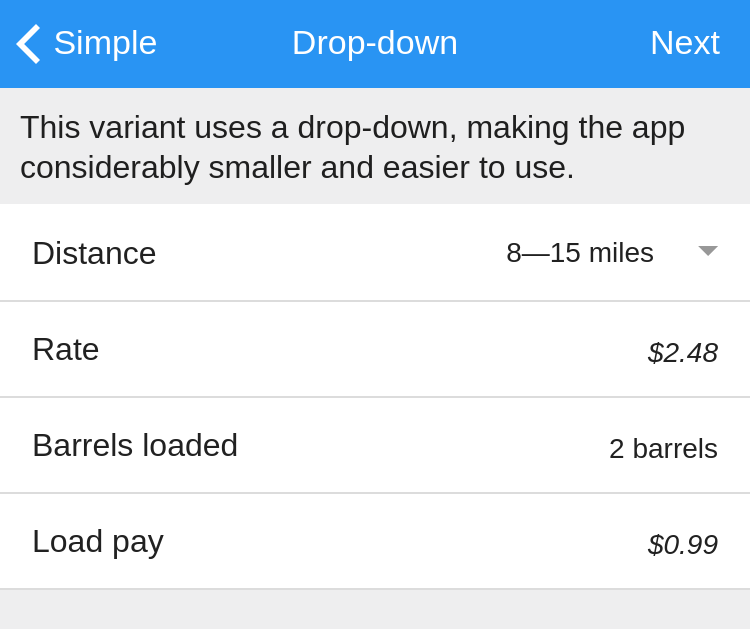
The Barrels loaded and Load pay fields are identical to the previous version. The new Distance field is a text drop-down field (select Text drop-down in the list in the inspector).
The drop-down field contains the following values:
0—8 miles
8—15 miles
15—20 miles
20—25 miles
25—30 miles
30—35 miles
35—40 miles
40—45 miles
45—50 miles
50—60 miles
60—70 miles
70—80 miles
80—90 miles
90—100 miles
100—110 miles
110—120 miles
Be sure to press the Edit as text button below the list values to edit the list more efficiently.
The Rate field is an output field which must use a formula to determine the rate depending on the value selected in the Distance drop-down field. Here’s the formula:
This formula uses the CHOOSE formula function in conjunction with the Index property of drop-down fields. It is a much easier way to write such formulas than using the IF formula function. Also, this formula has been automatically generated using an app, meaning that all we had to do was copy the column values and paste them into an app to have the formula generated automatically. Learn more about this process and the column converter app.
Allowing the distance to be entered directly
A third option is to enable users to enter the distance directly, instead of selecting it from a drop-down field. The Distance field is turned into a regular number field by pressing the button labeled 123 in the inspector.
Here’s what this version looks like:
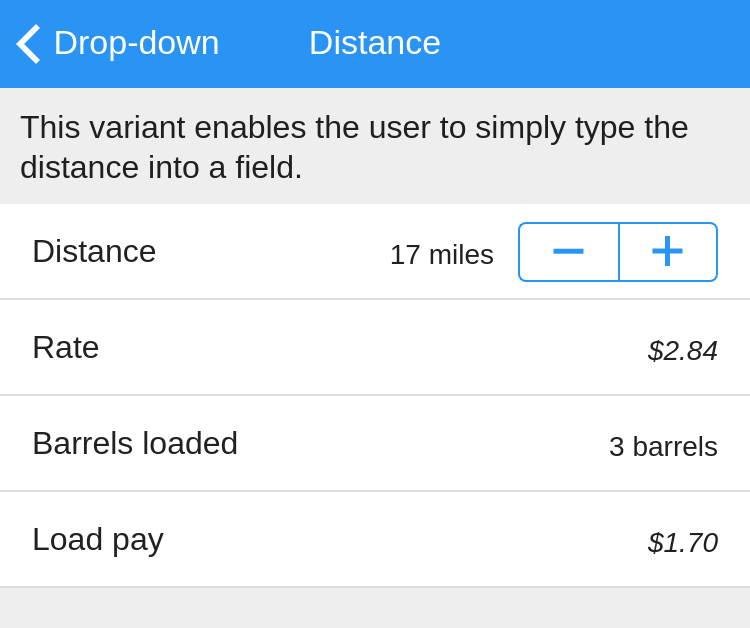
The plus and minus buttons are collectively known as a stepper. Enable the stepper by selecting the field and pressing Show stepper in the inspector.
To determine the rate from the entered distance, we need to discard the CHOOSE formula and instead start using the IF formula function. Here’s the formula:
This formula is significantly longer than the one using the CHOOSE formula function. What’s more, you need to write it manually. Unlike the CHOOSE formula, it can’t be automatically generated using an app.
There you have it, three different ways of converting a simple spreadsheet to an app. Which version you prefer depends on how you expect the app to be used and on the preferences of your users.