Apps created before our April update were accessible to anyone with the app link. There was no easy way to revoke access from a person who previously had access to an app. Also, you couldn’t be certain that your apps would not be indexed by search engines, thereby showing up in search results.
Some users tried to work around these limitations by using a sign-in panel as their app’s first panel and only allowing users to continue to the app proper if the entered password checked out. While Calcapp on the surface may have appeared to be powerful enough to implement a sign-in form, doing so is actually not secure.
When a user runs an app, it is downloaded in its entirety (explaining why apps work offline), including all your sensitive data. Users with only moderate technical skills can easily get past sign-in screens implemented this way.
Calcapp now supports what we call private apps, which require your users to sign in before gaining access to your app and require you to define who those users are. We still support apps accessible to anyone (public apps) and apps meant to be embedded in your website (embedded apps).
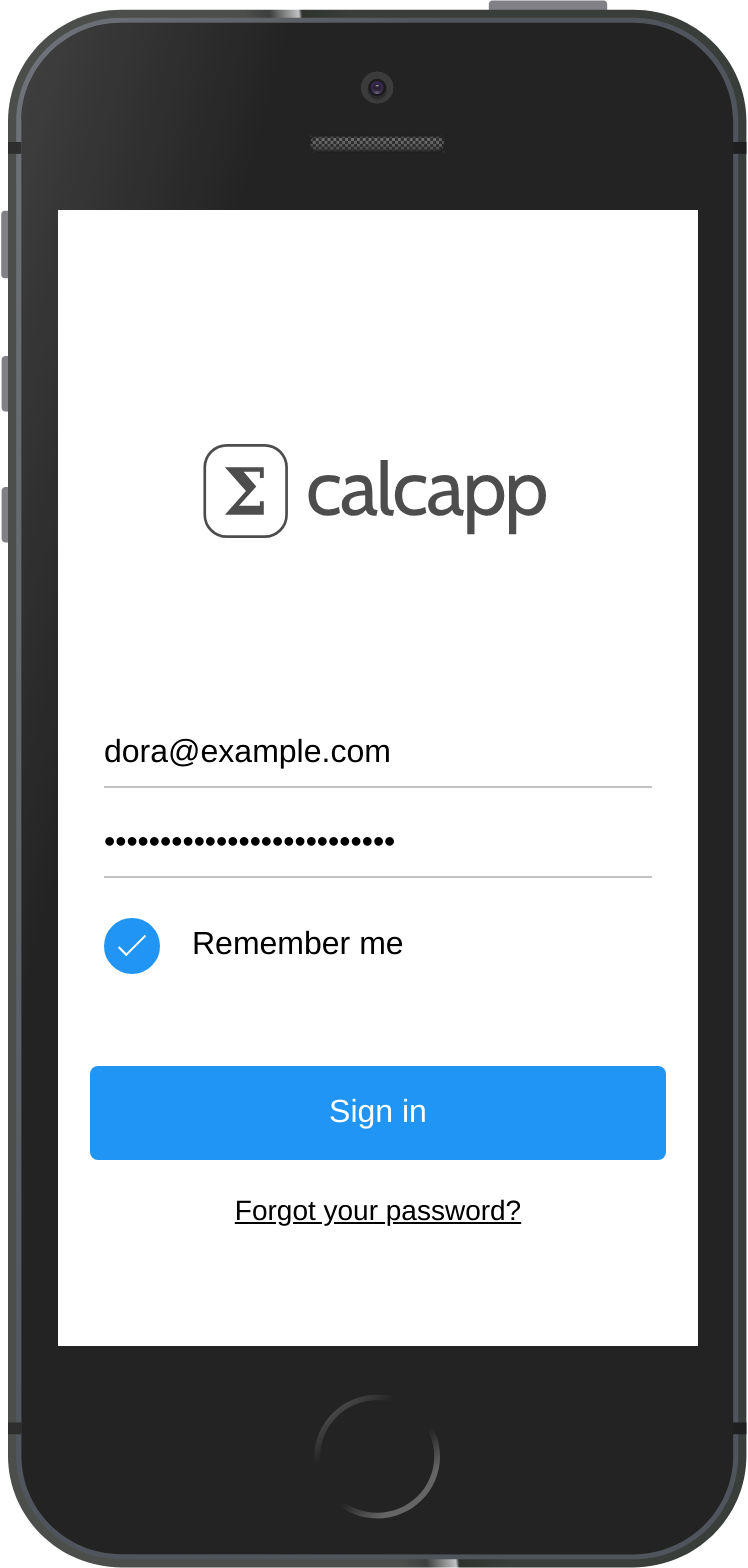
Private apps initially display a sign-in screen, which you can customize if your apps are on the White Label plan:

Credentials are stored, saving your users the trouble of signing in every time. Once accessed, apps work offline, but require your users to sign in at least once every 30 days. (That enables you to revoke access to apps and to be fairly certain that unauthorized users are not able to access your apps indefinitely by running them offline.)
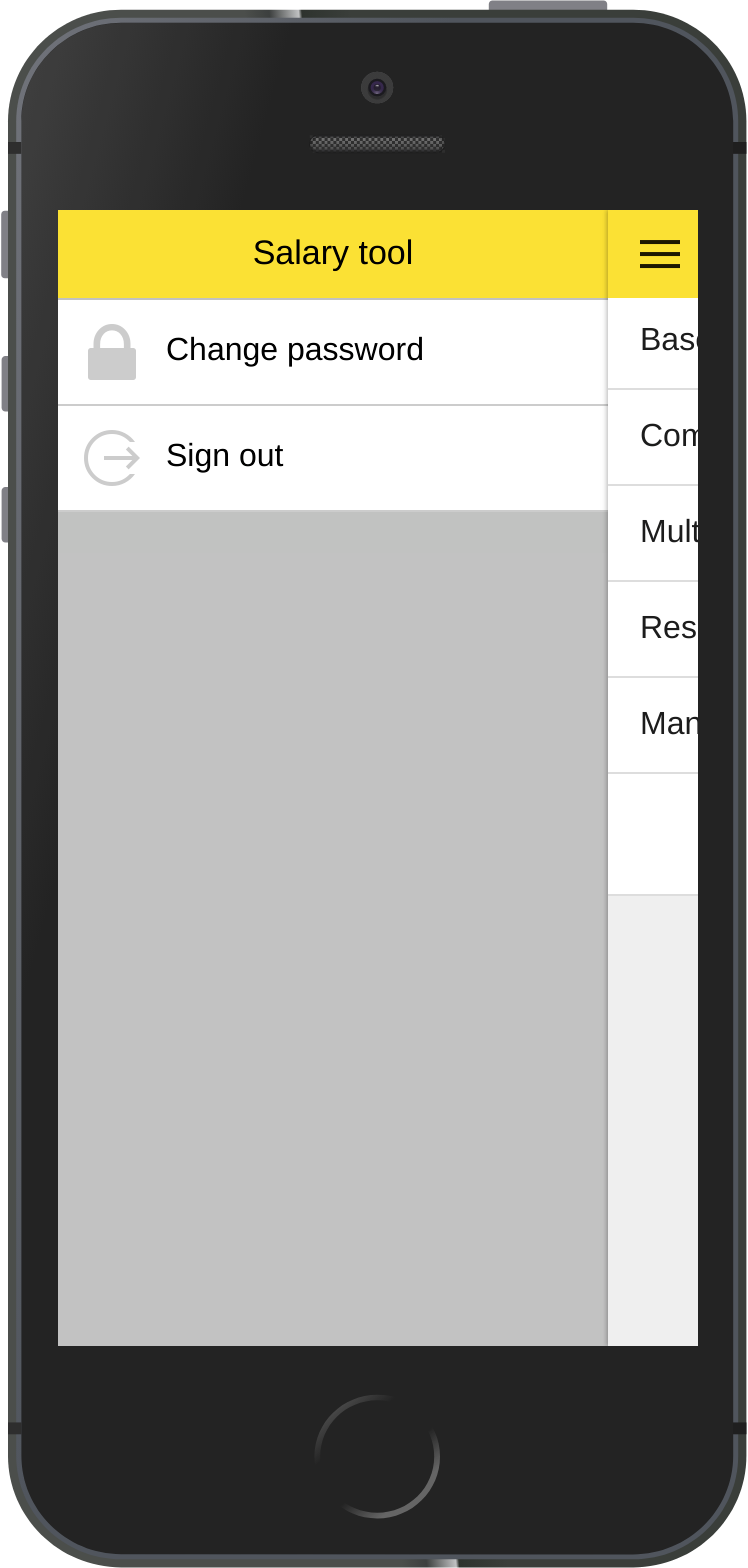
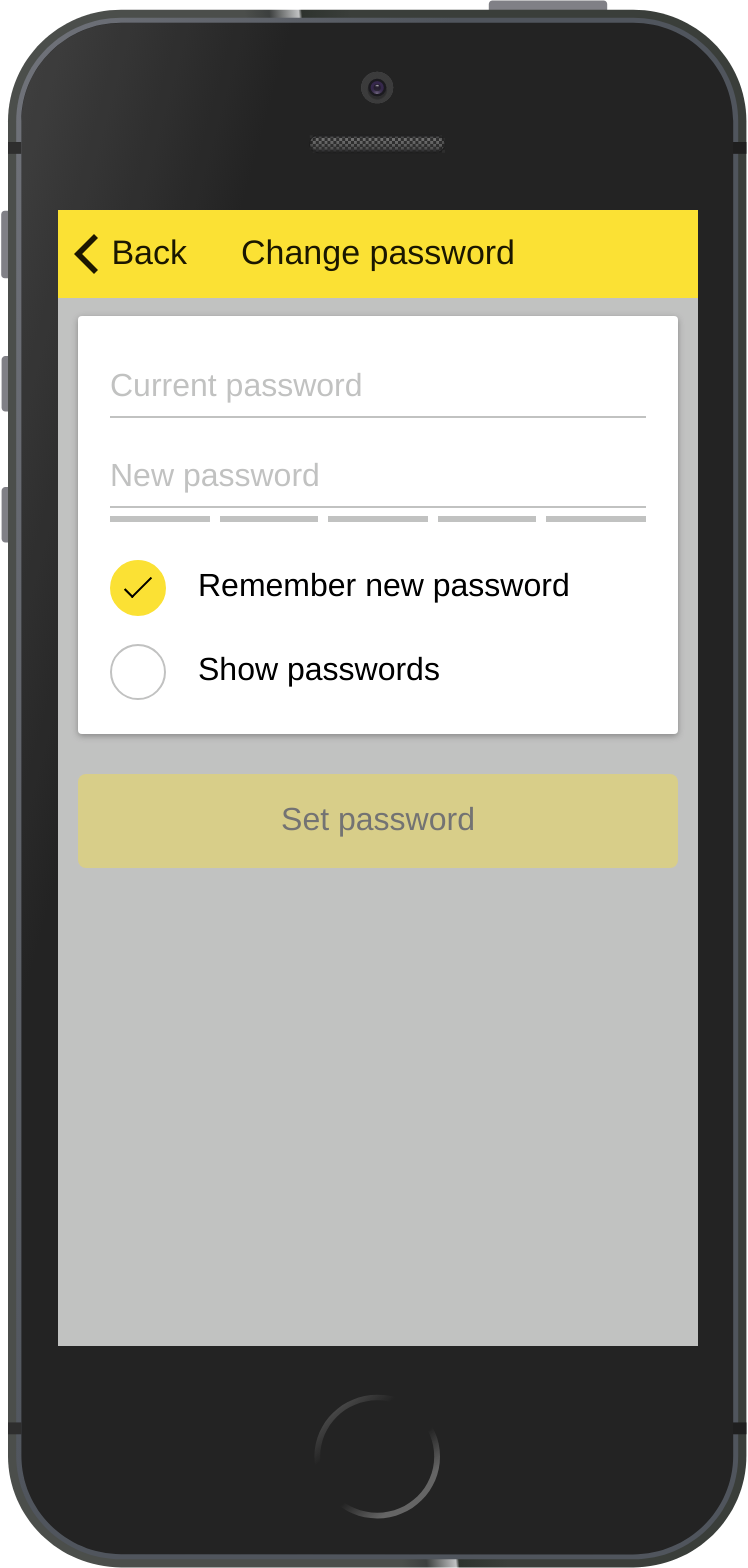
Your users select a password when they first run the app, by clicking a link in an email you send them through Calcapp Creator. The app’s sidebar enables them to change their password or sign out. They also get access to a password reset feature:

These new user interface elements of your app follow the theme colors you have set.
All Calcapp-provided labels and captions that appear in your apps have been translated to around 30 languages. These translations have been updated for the sign-in, password reset and password change screens.
We use human translators for some languages and machine translation for others. Let us know if you find translation errors.
Making an app private
Make an app private by selecting a private plan for it. This window appears when you select Change plan… from the main menu :
(Learn more about how to select an appropriate plan.)
Defining users
Here’s what the top of the inspector looks like when your app is private:
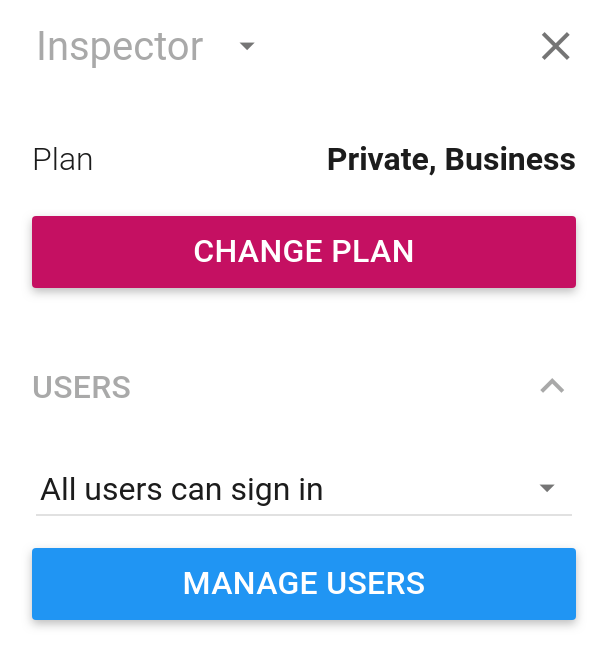
Press Manage users to determine the users who can sign into your app:

Add users simply by typing their email addresses into the Add new field.
Private apps have been engineered to support thousands of users, with no loss of performance.
Inviting new users
In order for your users to start using your app, you need to invite them through email. Press the Share/Update app button in the top bar to bring up the Share window:
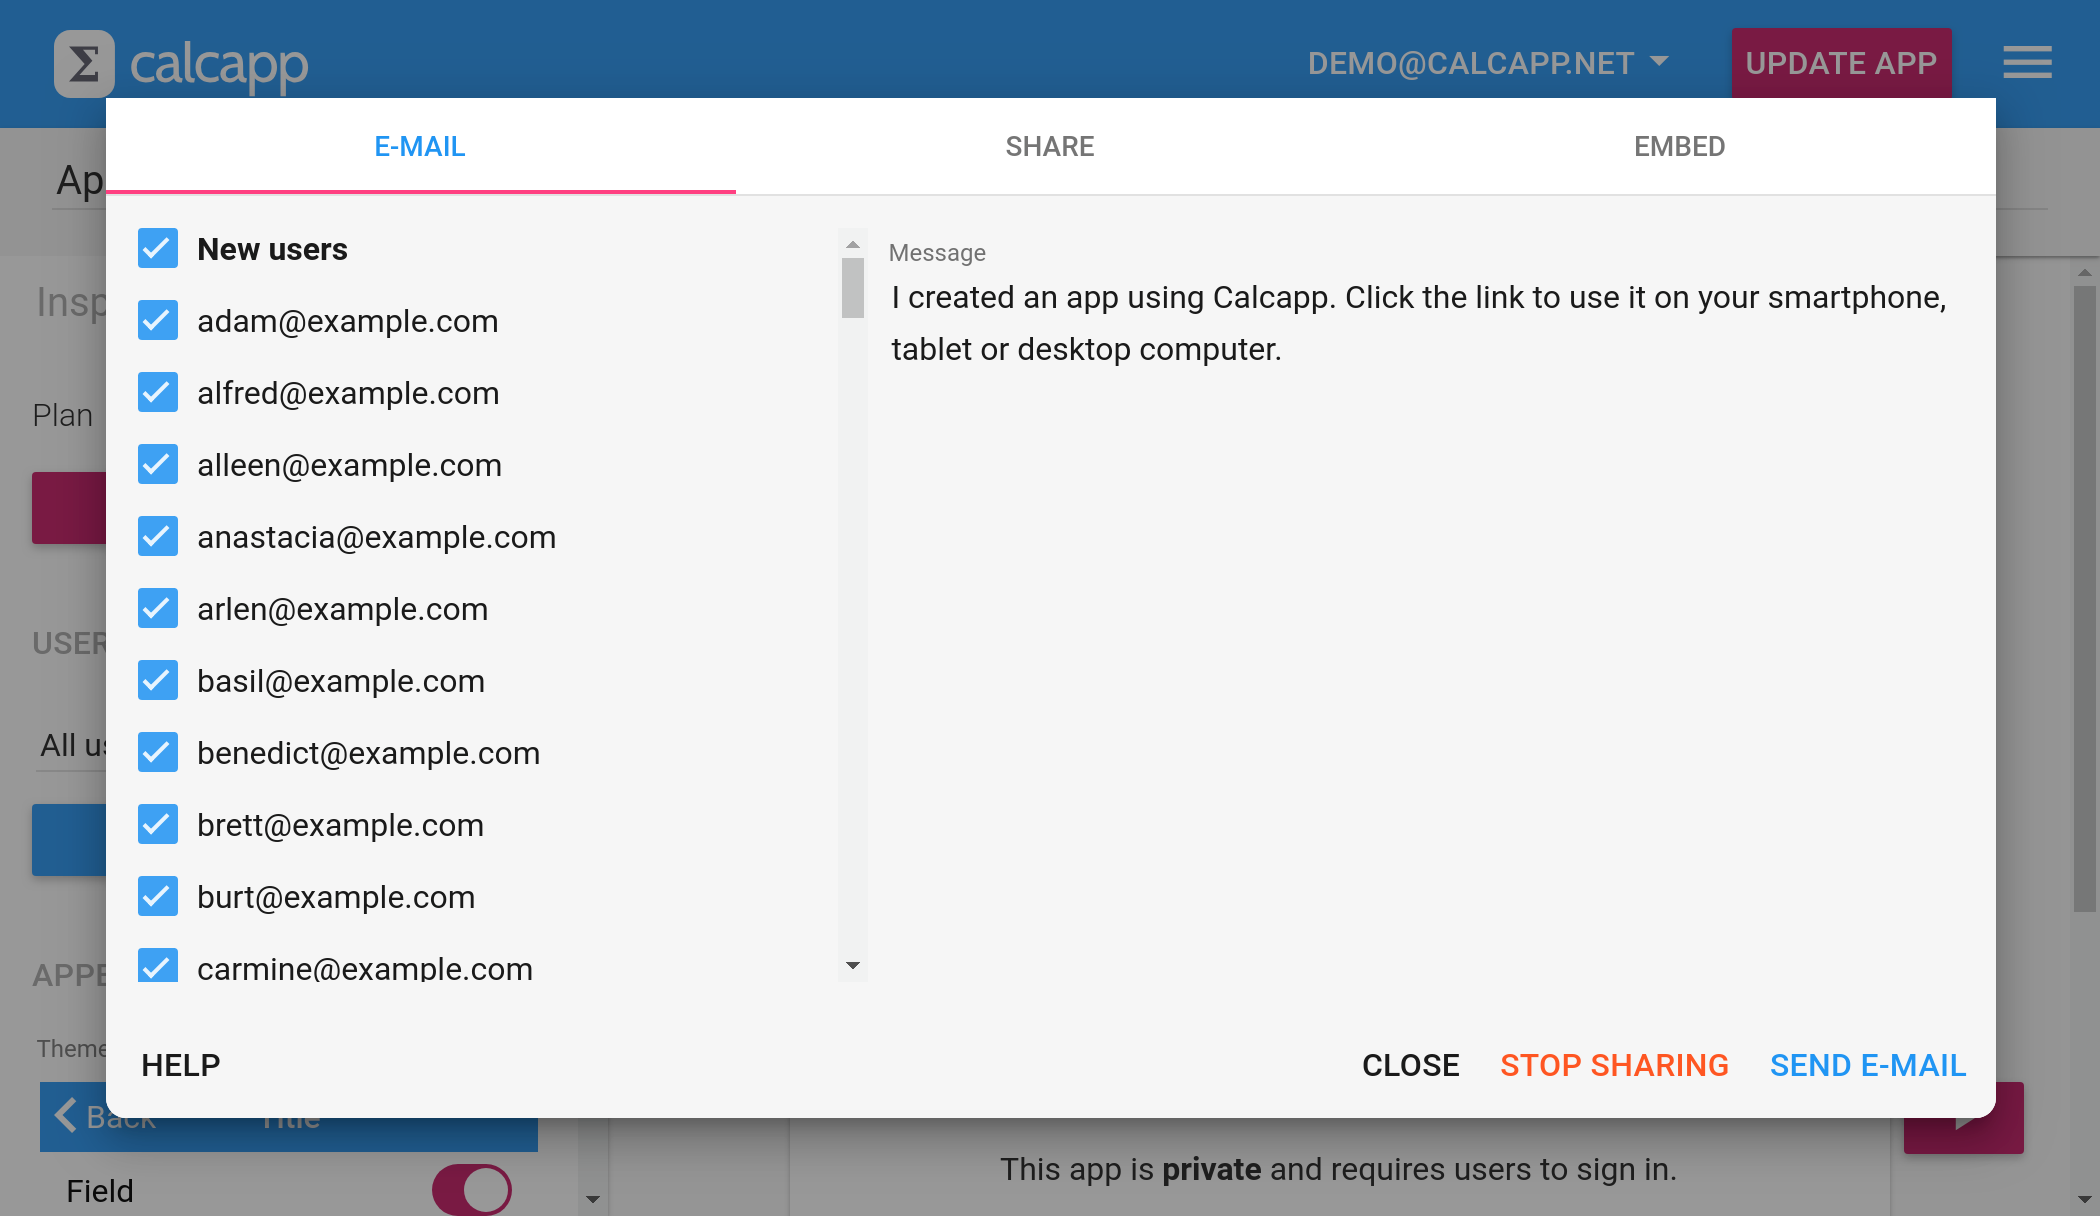
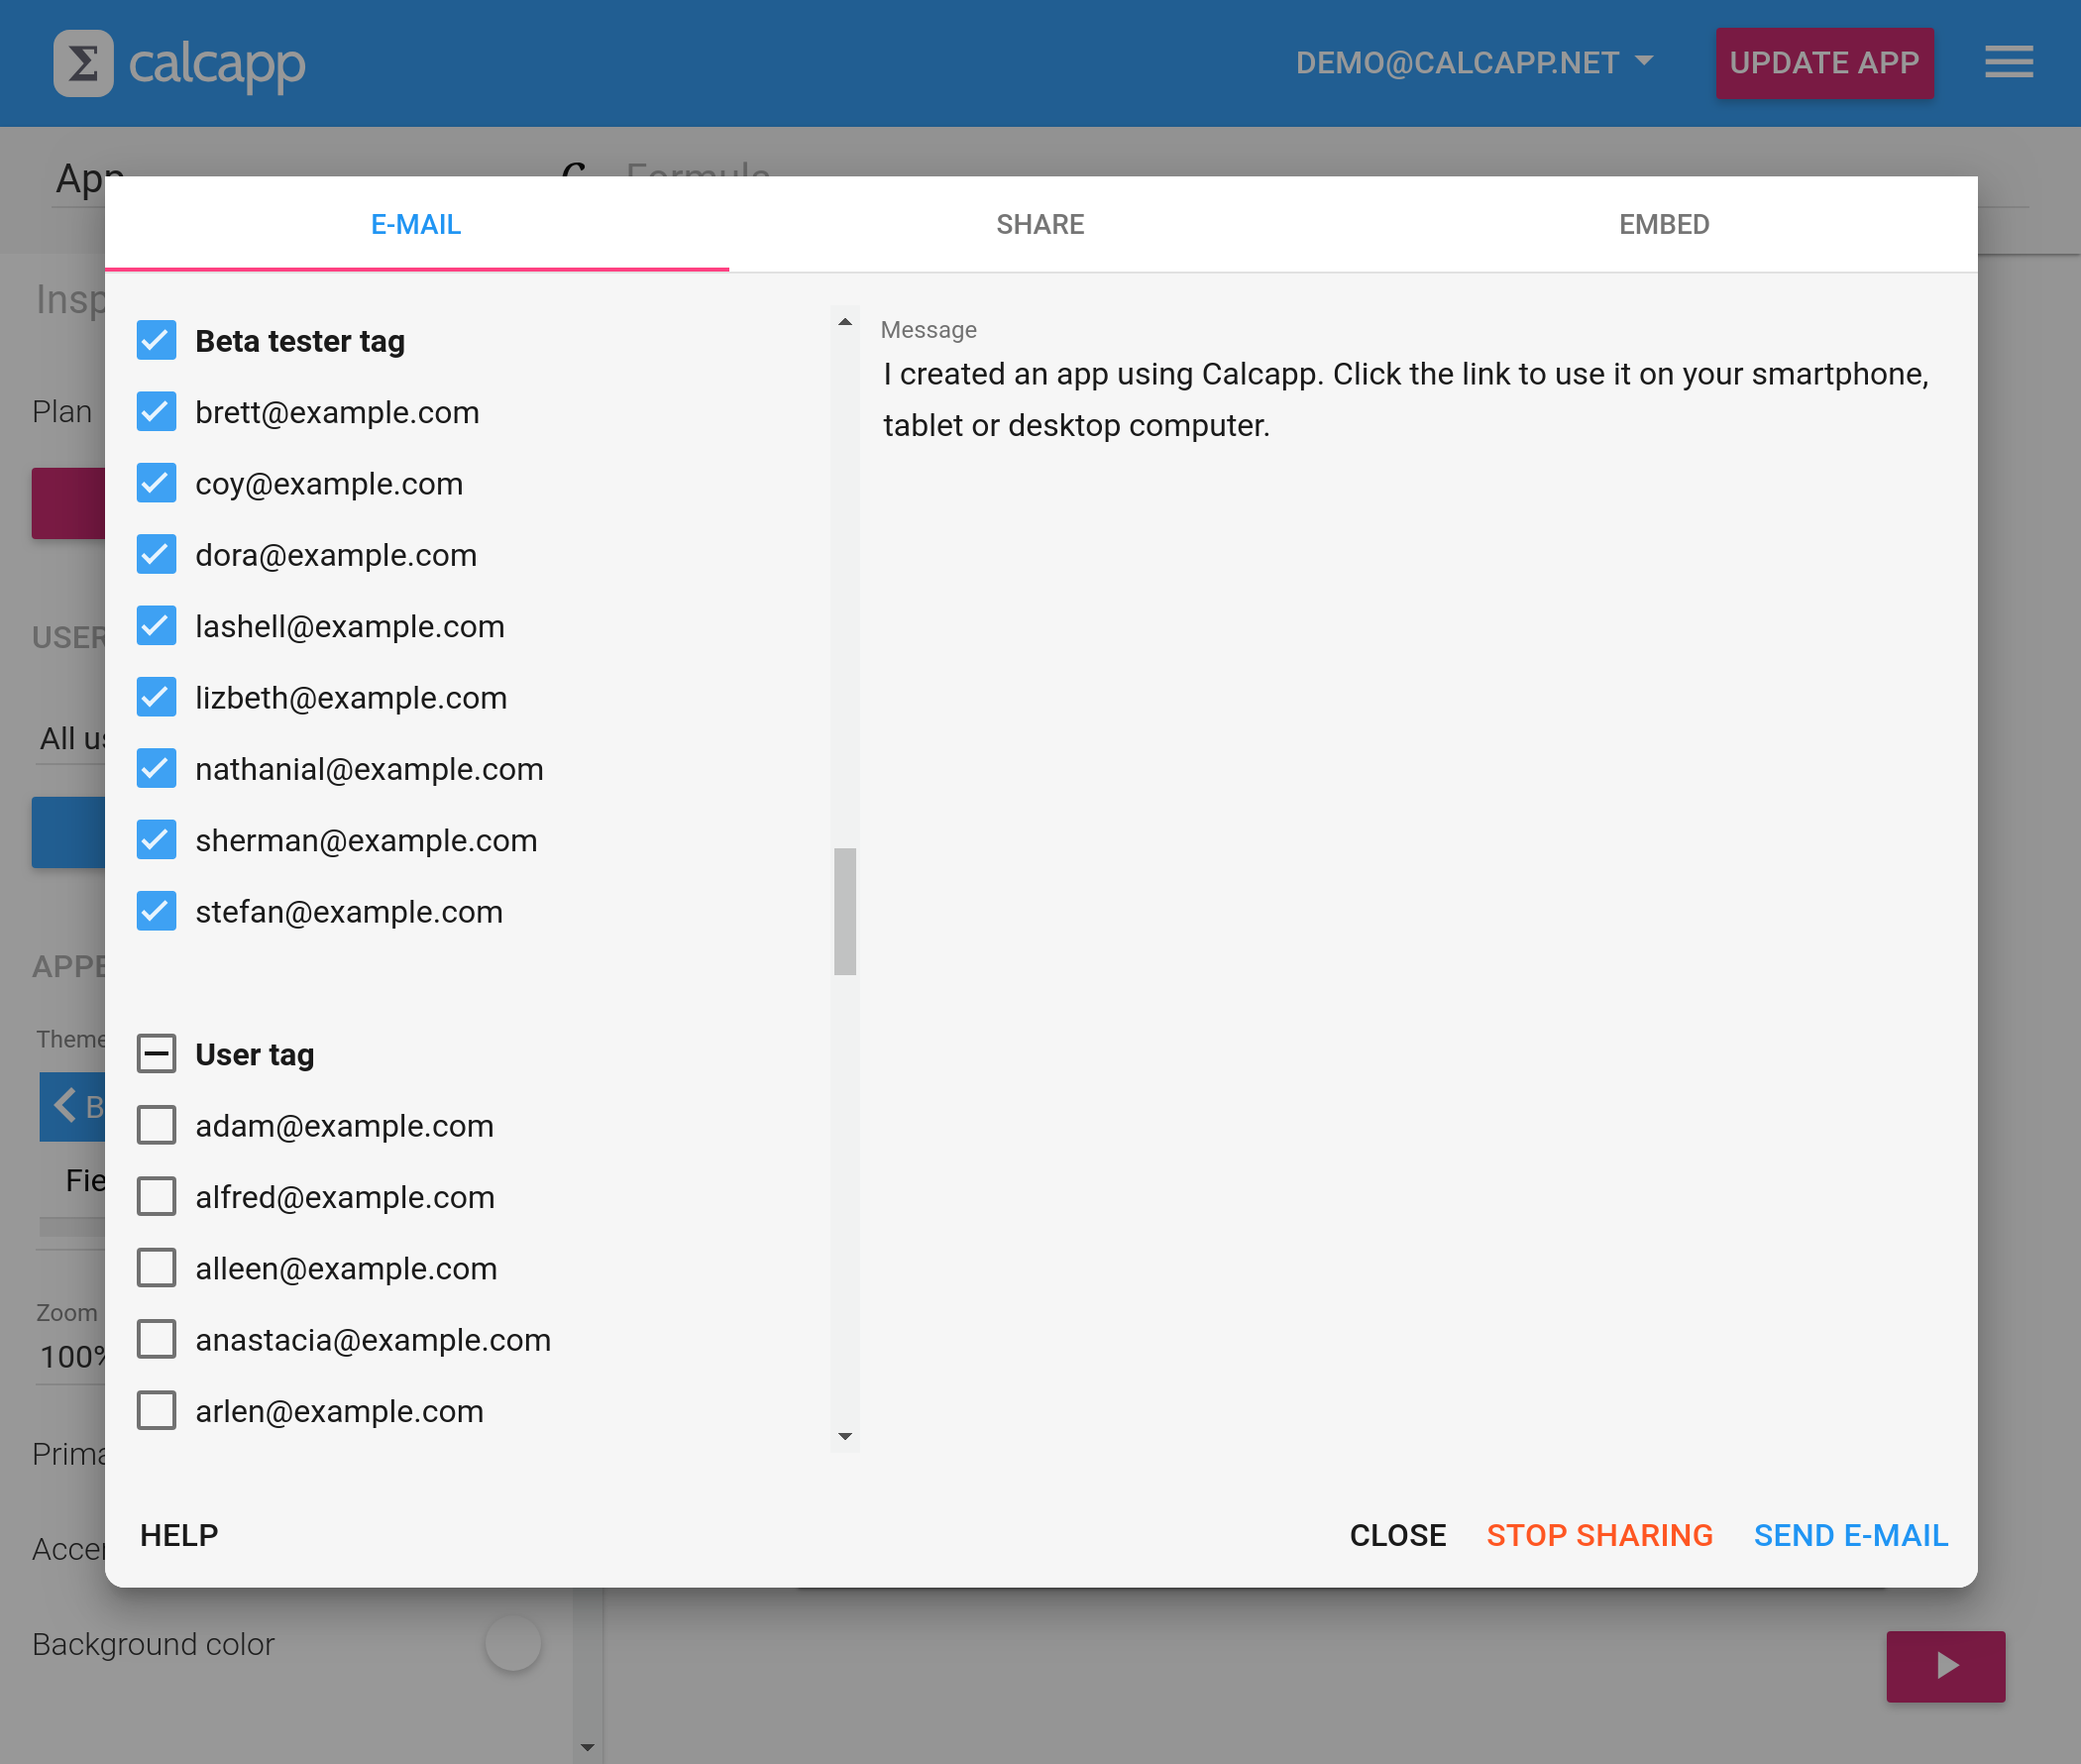
The Share window for private apps doesn’t allow you to type a list of recipients manually. Instead, all users who can run your app are listed to the left of the email message, along with checkboxes determining whether users are included among the recipients.
Users who haven’t yet signed into your app and selected a password are listed as new users. Click the New users heading to conveniently check all checkboxes belonging to new users.
If you share a private app with a user who has already signed in and selected a password, a regular link to the app is sent. New users, however, get sent a special link that signs them in automatically and allows them to select a password.
Defining tags
A user can be associated with one or several tags, which are simple text strings you select. Tags are primarily used to control whether a user is allowed to launch a certain private app, but have several other uses.
Use the Manage users window to assign tags to users. By default, every user is associated with the tag User. To add a tag to a user, simply start typing in the field marked +Tag next to a user. Remove a tag by clicking its symbol:
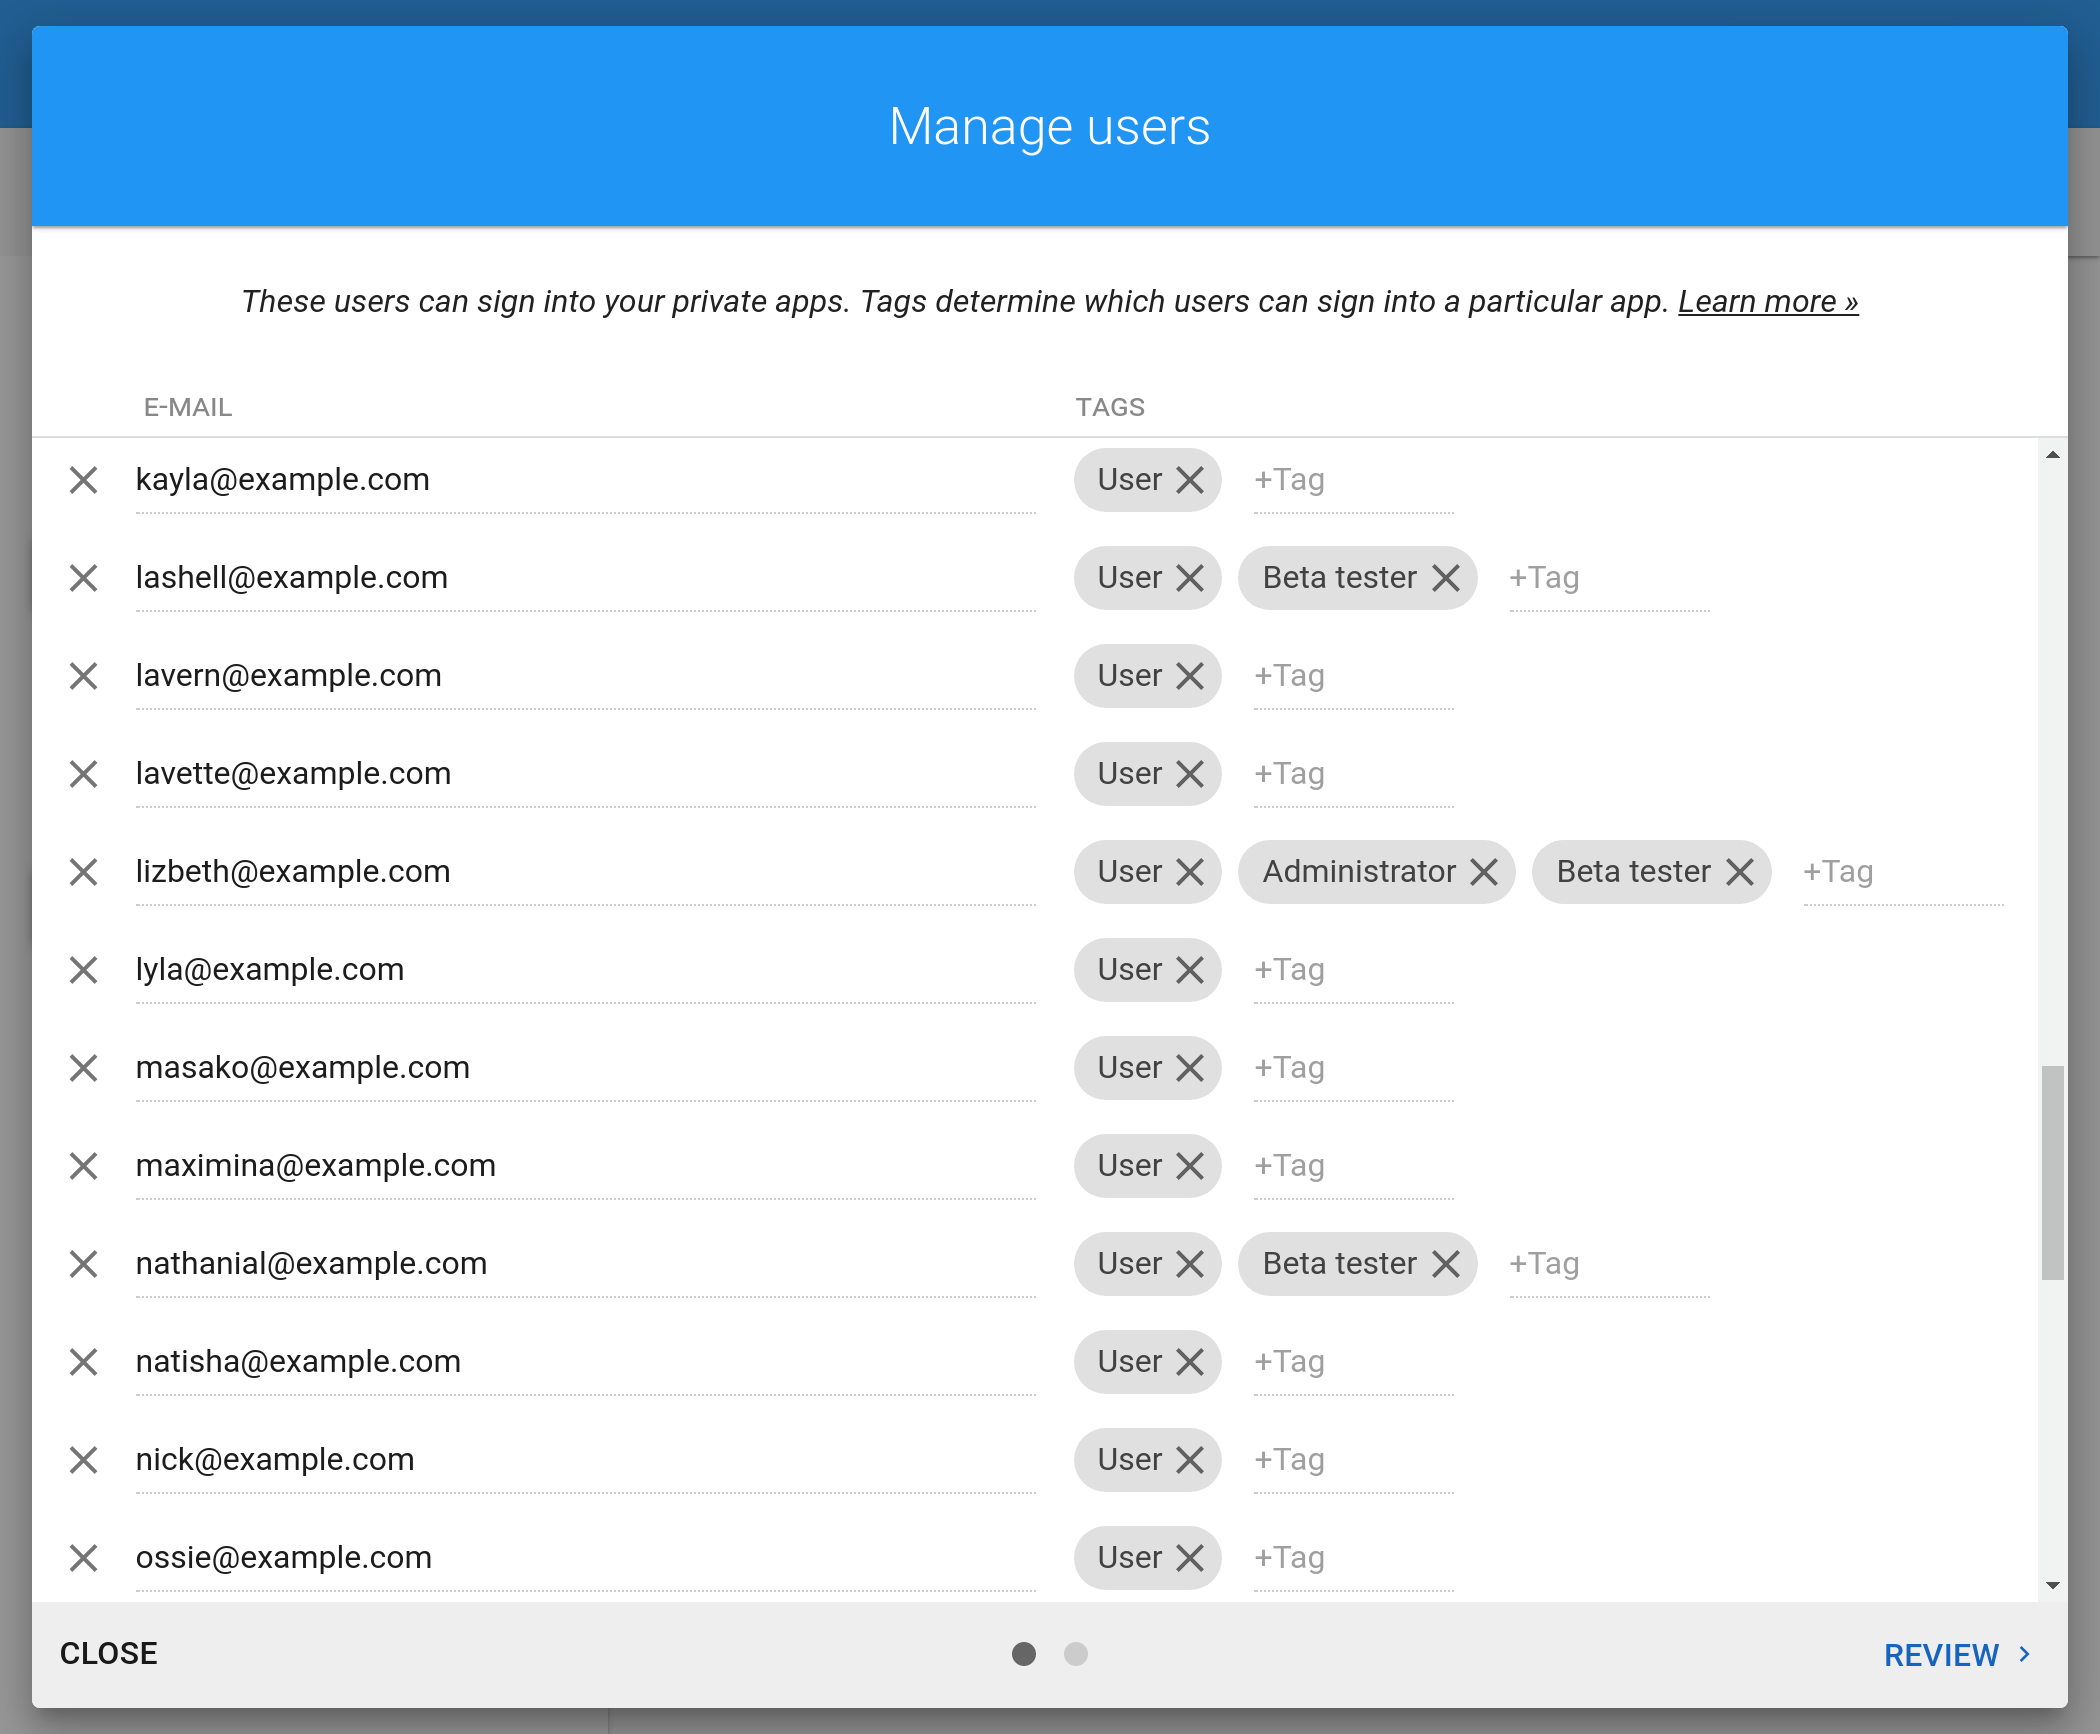
In this image, most users have only been assigned the default User tag, but three users have been assigned the Beta tester tag and one has been assigned the Administrator tag.
Using tags to control who can sign in
The list of users is shared between all private apps, so if you do nothing, all users you define can sign into any private app you create. To only allow certain users to access your app, find the Users section in the inspector and select Only some users can sign in from the drop-down that initially reads All users can sign in:
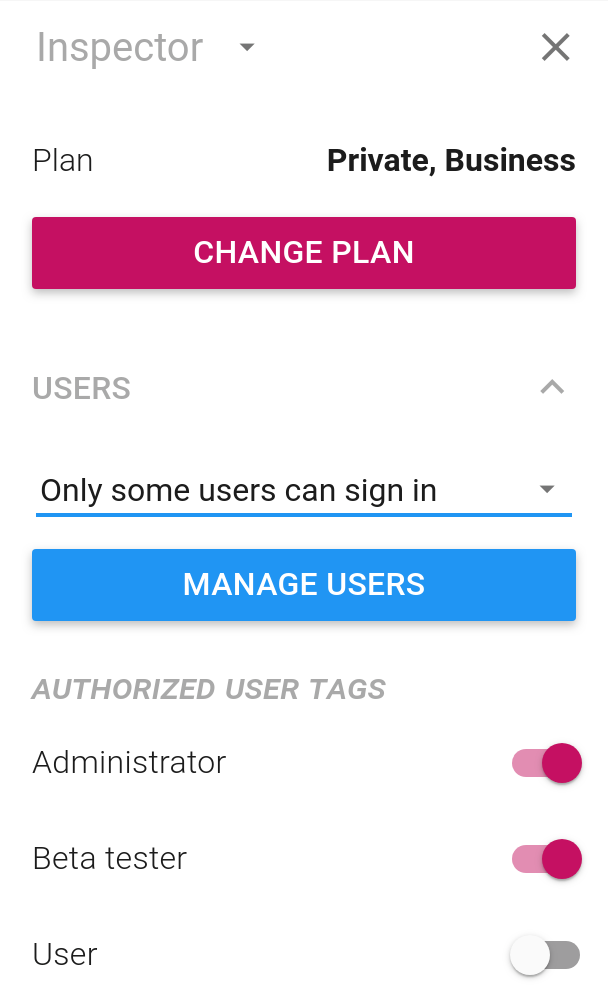
The private app in the image above is a beta version of a company’s regular app. As such, only administrators and beta testers may sign into it, meaning that the User tag has been explicitly disabled.
Tags are flexible and you can use them however you wish. Let’s say you have three private apps and there’s no overlap in terms of the users who can sign into them. The best course of action in this scenario is to create one tag per app and adjust the app settings such that only users tagged with the proper app tag are allowed to sign in.
Using tags when sharing app links
The Share window, which appears when you press the Share/Update app button in the top bar, lists users by tag. As users can be associated with several tags, the same user may appear several times under different tag headings. Click a tag heading to select or unselect all users with with that tag.
Here’s the Share window with all users tagged with Beta tester selected:
Consider adding tags to users for the sole purpose of making it easier to send — or not send — email to them. For instance, an app may be accessible to thousands of users in your organization, but only a couple of hundred users may want to be notified when you make changes. Use a special tag for these users to make it easier to send email to them exclusively.
Using tags through formulas
What if you want certain parts of your app to only be accessible to your power users or beta testers? Perhaps you’d like your app to display verbose step-by-step instructions, but only for users new to your app? Maybe you’d like to enable trusted users to add rows directly to your Google Sheets spreadsheet, but force other users to send you an emailed report instead so you can look over the data first?
All this is possible with tags and the new formula function USERHASTAG. It takes a tag as its sole parameter and returns TRUE if the signed-in user is associated with that tag and FALSE otherwise.
Here are a few interesting uses of the USERHASTAG function:
-
Prevent a user from moving to the next panel by associating a USERHASTAG formula with a panel’s NextPanelAvailable property.
-
Show a list panel option exclusively for beta testers by associating a USERHASTAG formula with a list panel option’s Visible property.
-
Disable a button that sends data directly to a Google Sheets spreadsheet by associating a USERHASTAG formula with a button’s Enabled property.
-
Display helpful step-by-step instructions only for beginning users by associating a USERHASTAG formula with a text box’s Visible property.
If you’d rather base decisions directly on users’ email addresses
instead of their tags, you’ll be glad to know that the user’s email
address is accessible as the UserEmailAddress property of
your app. If you haven’t changed your app’s formula name, write
App.UserEmailAddress in
your formula to access the email address of the signed-in user.
Warning: While you can hide information from users based on the return value of USERHASTAG, be aware that the hidden information is transferred to all users, regardless of their tags. In other words, a savvy user could uncover the hidden information, regardless of the tags you have assigned him or her. The only secure way to prevent sensitive information from leaking is to put it in a separate app and instruct Calcapp to only allow access to users with tags approved by you.