Many apps created with Calcapp look up values found in data tables and present the results to the user, rather than doing traditional math. This data can include everything from tax brackets to information on the products offered by a company.
In this release, we are introducing a spreadsheet-like data editor for creating and updating tabular data, in the form of named values.
Named values are not available in any of our legacy plans, meaning that you may need to upgrade to access named values and the data editor. These features are available in our 2023 Business and White Label plans. They are fully functional in Calcapp Creator’s preview sidebar, though, so you can get a feel for them, regardless of your plan.
Introducing our new data editor
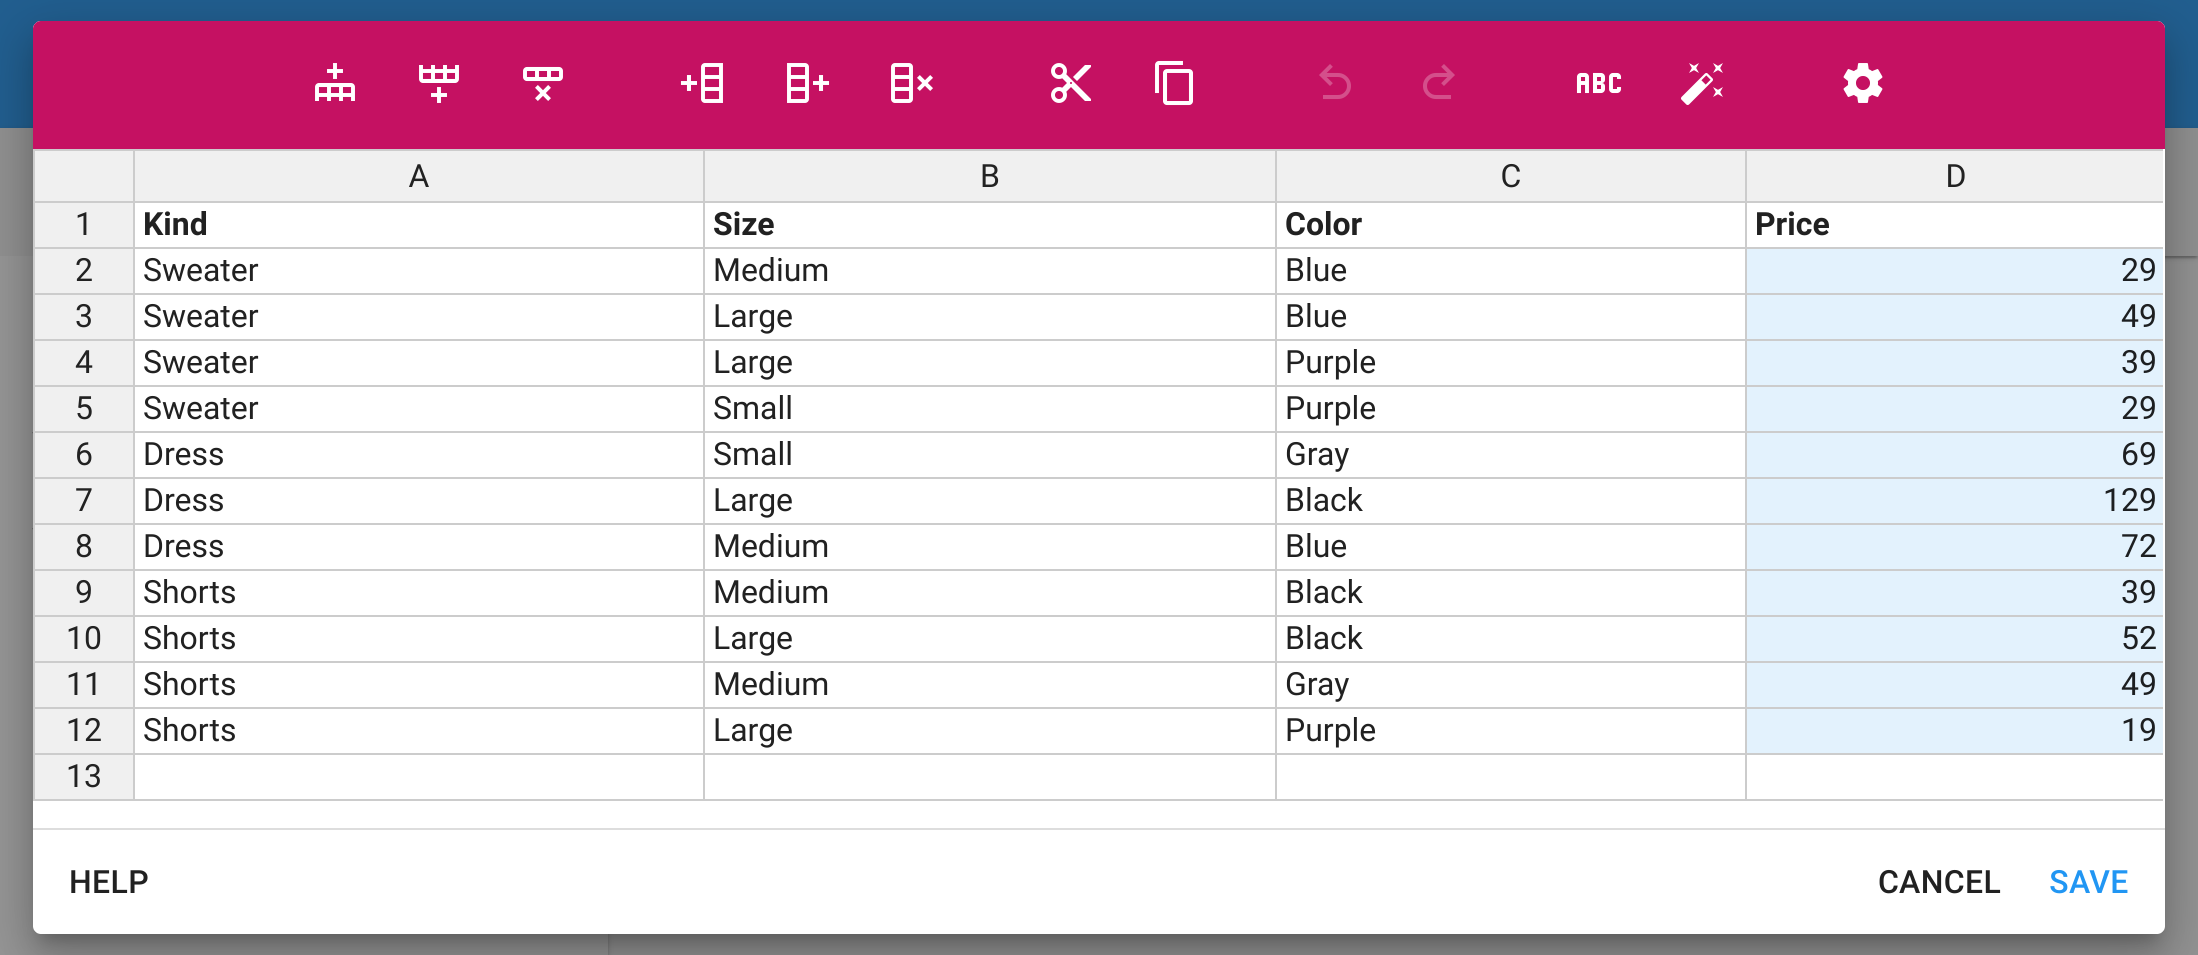
This is what our new data editor looks like:
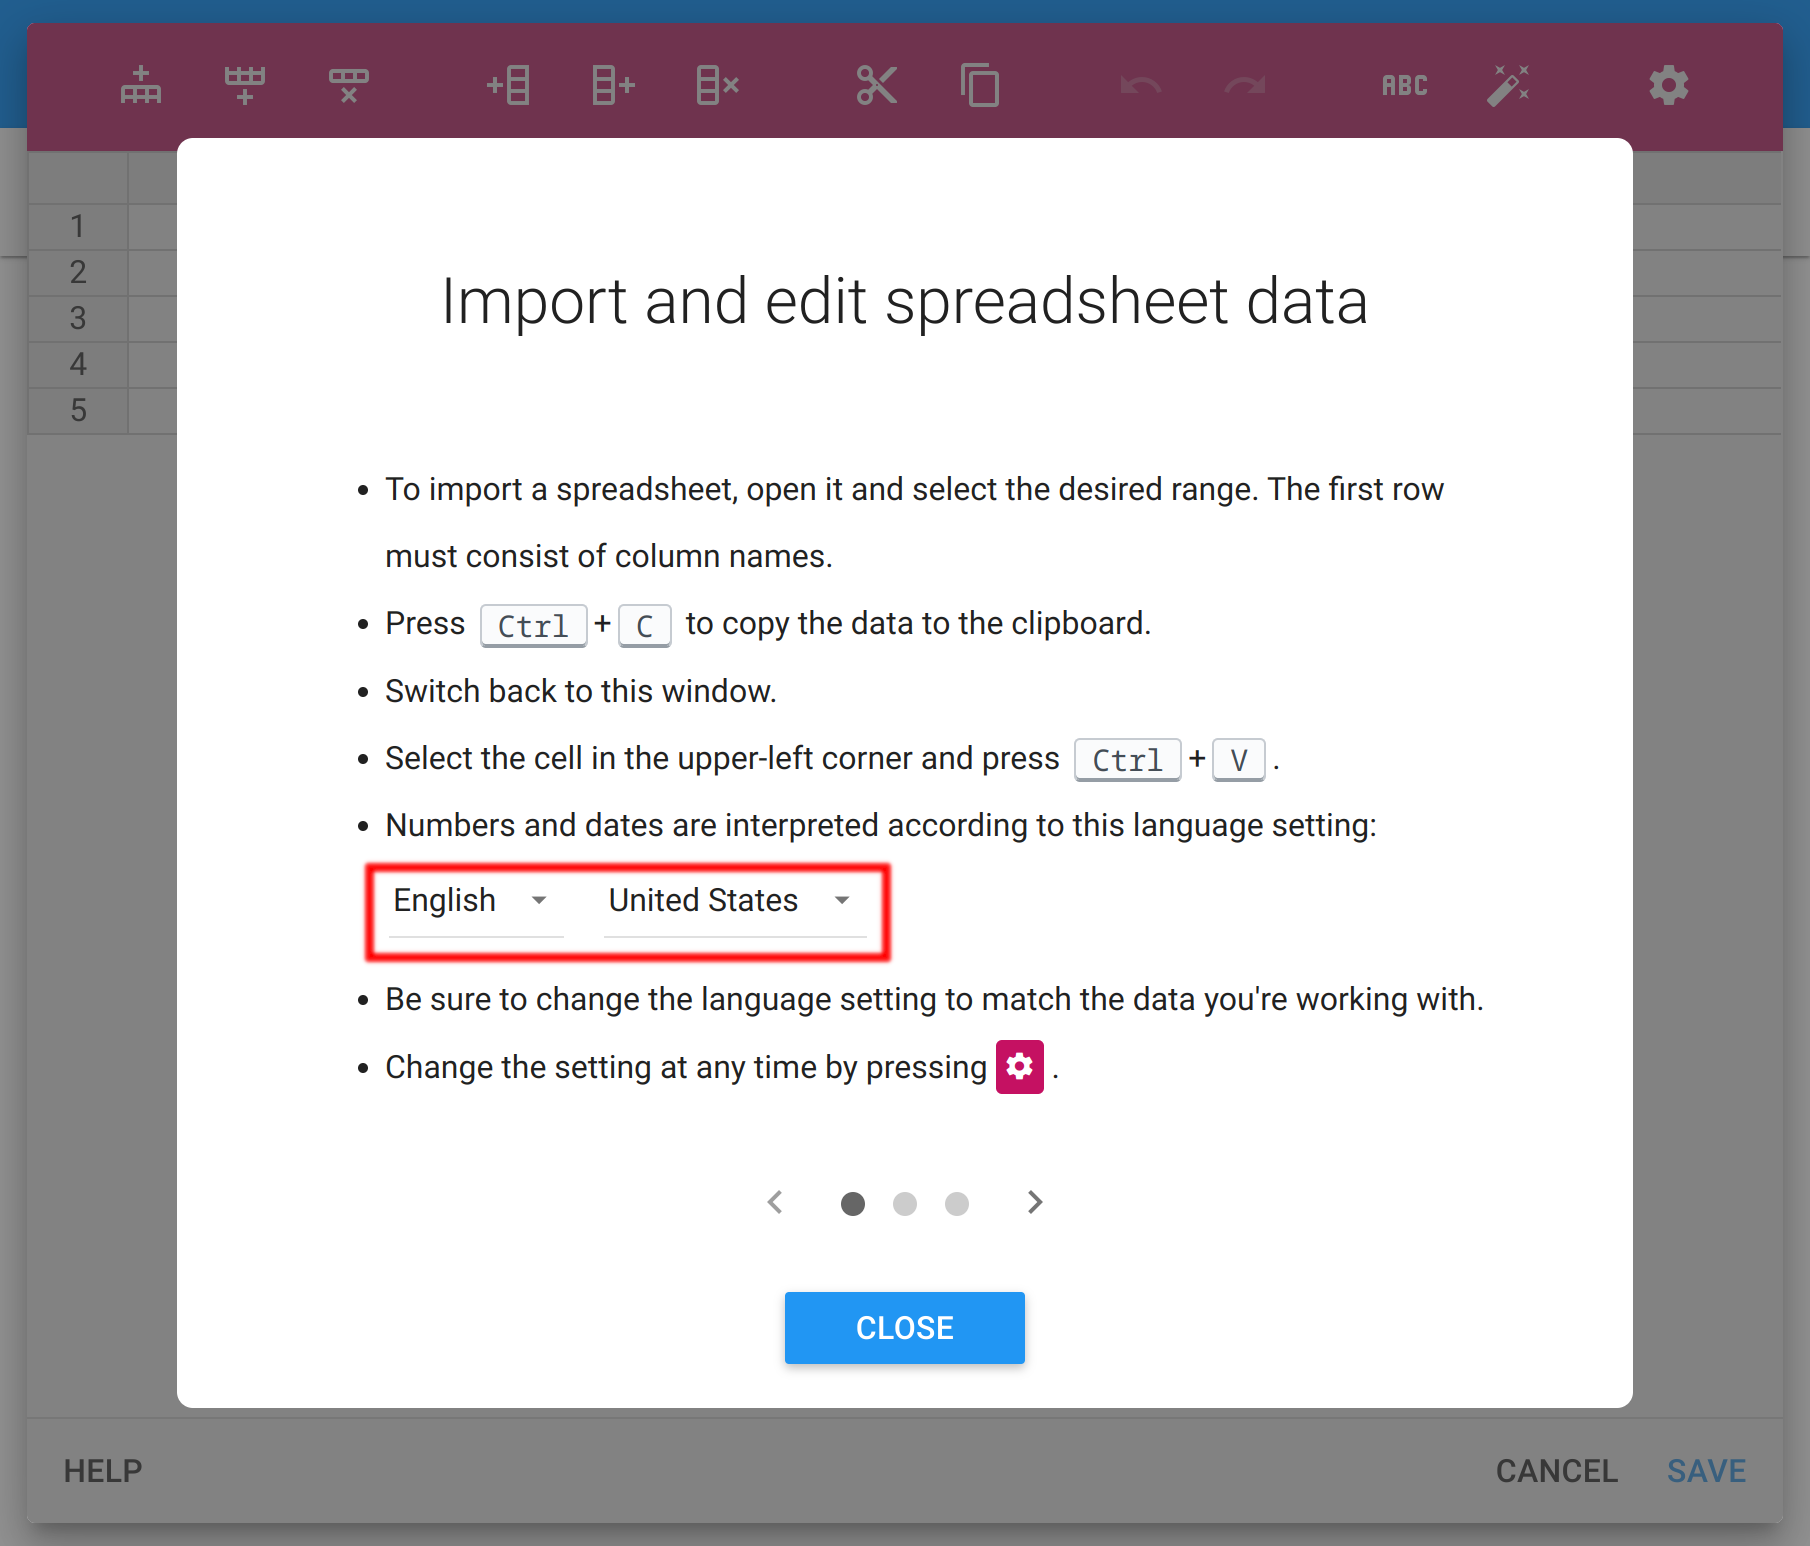
To insert data and bring up the data editor, press the new DATA button in the app designer:

The first row must consist of column names.
To transfer data from your spreadsheet, follow these instructions:
-
Switch to your spreadsheet.
-
Select the desired range.
-
Copy the data to the clipboard (press Ctrl+C on PC or ⌘+C on Mac).
-
Switch back to Calcapp Creator and the data editor.
-
Select the cell in the upper left corner.
-
Paste the data from your spreadsheet (press Ctrl+V or ⌘+V on Mac).
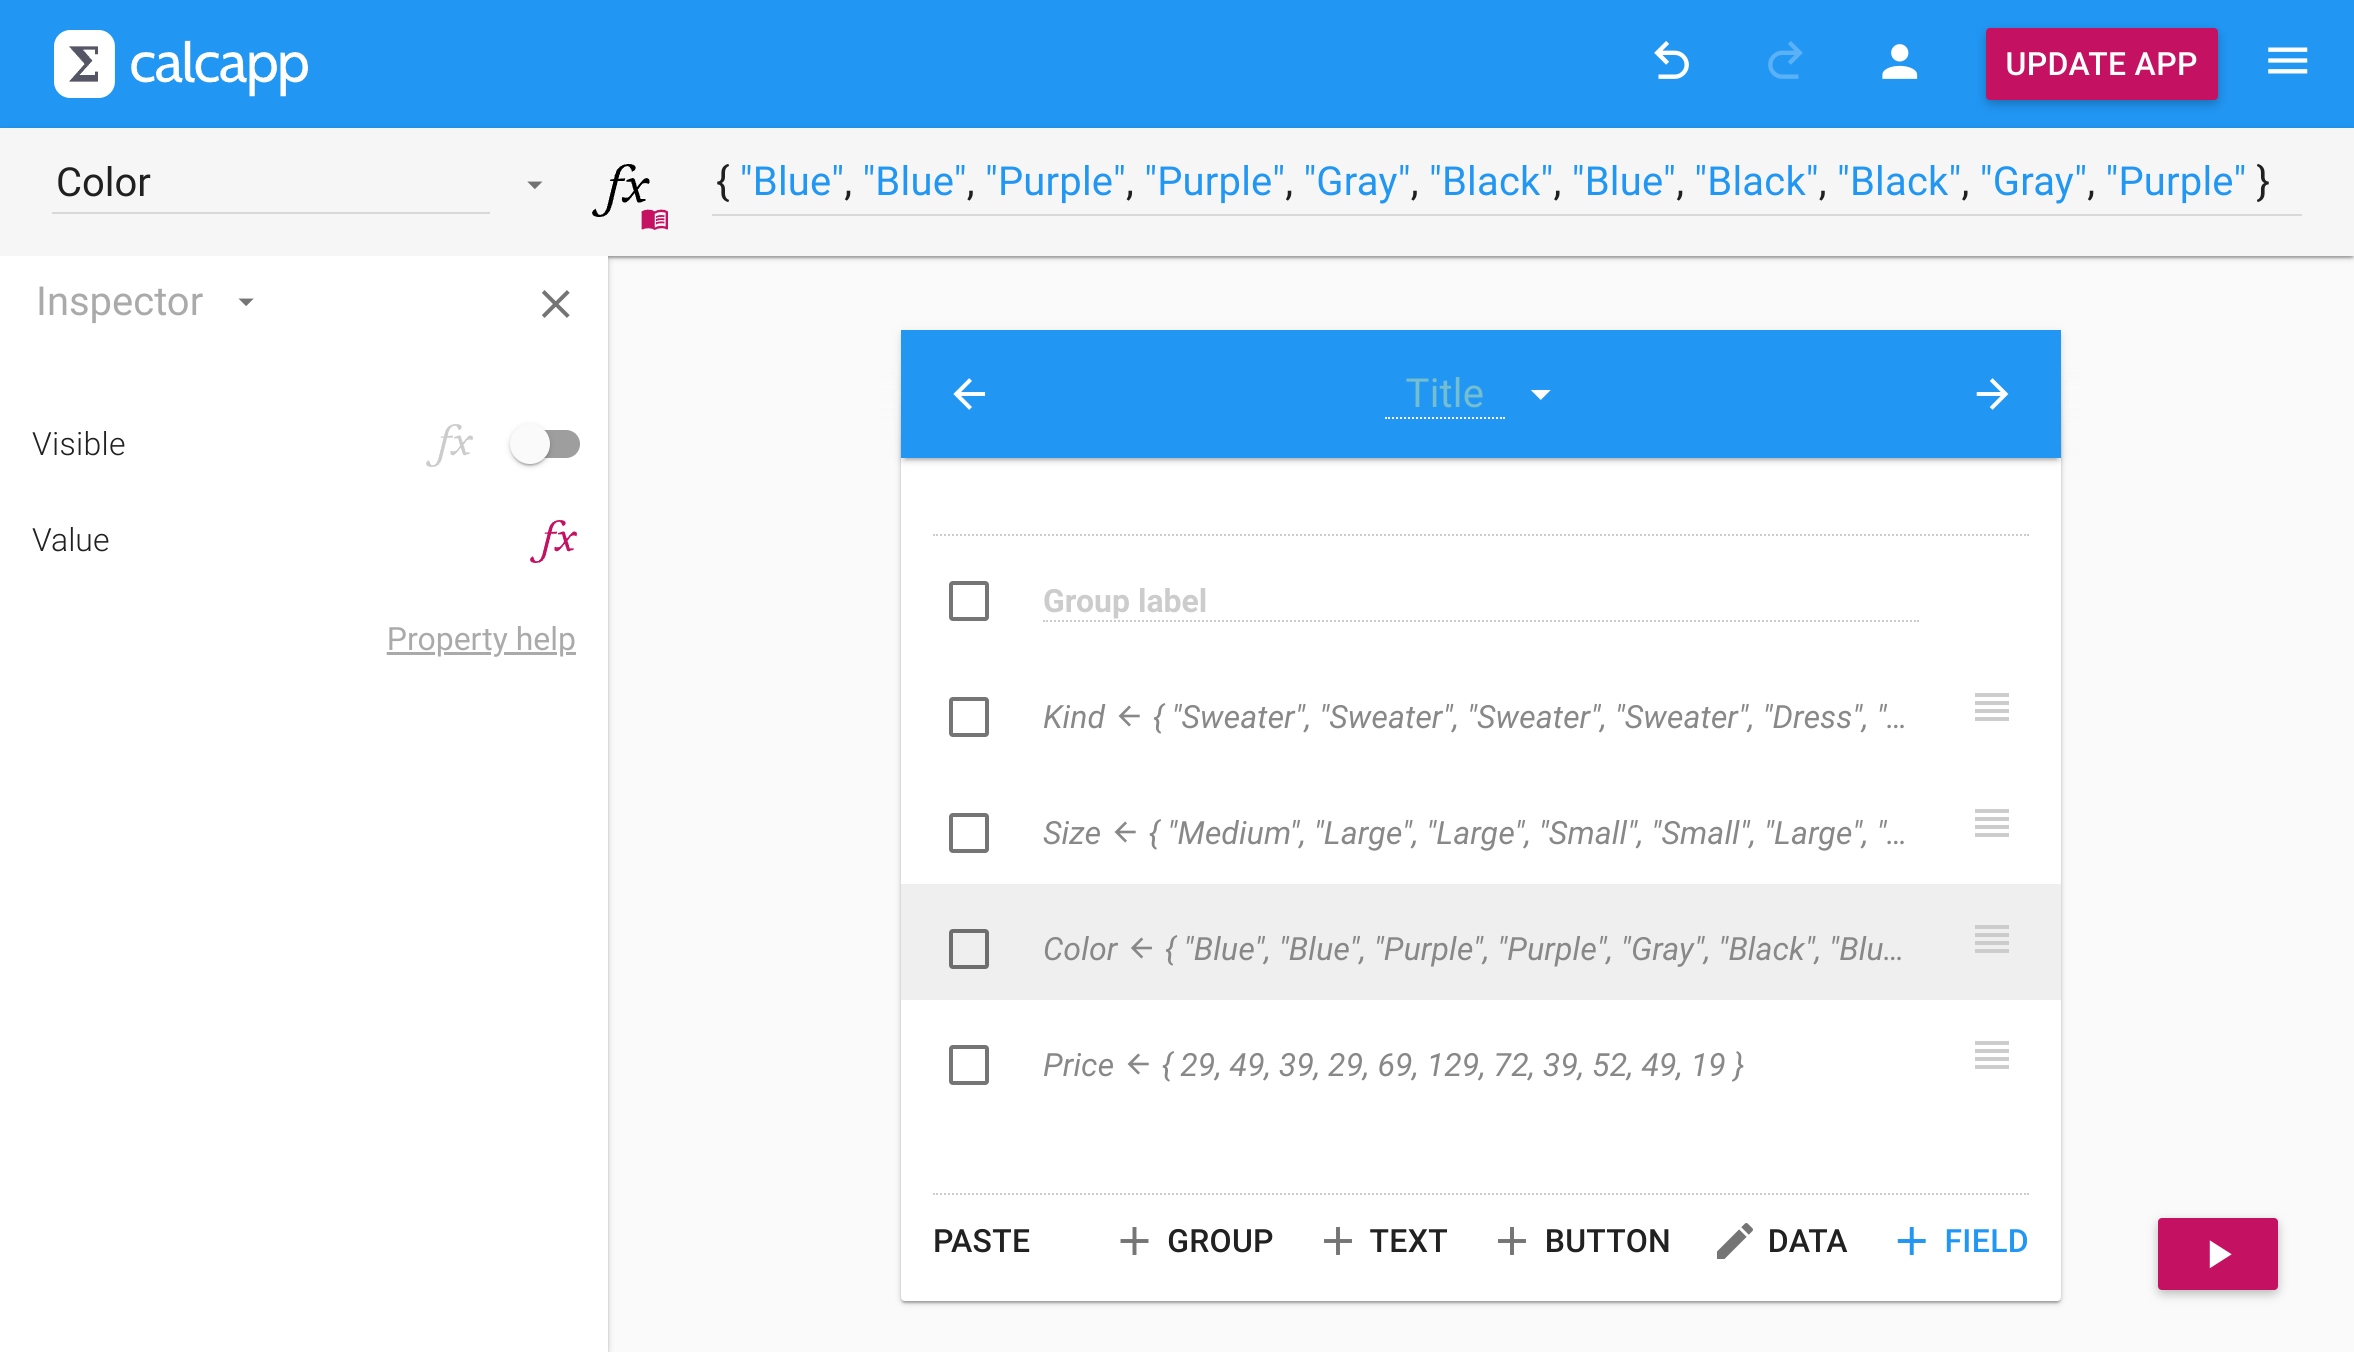
When you click Save, one named value per column is created:
Editing the data
The DATA button changes to DATA when a compatible named value is selected, allowing you to edit the data using the data editor.
You can also change the generated formulas of the named values directly. If the formulas look as though they could have been generated by the data editor, you are still able to edit them using the data editor.
If you need to rename a column, rename the named value in the app designer instead of renaming the column in the data editor. If you do the latter, the data editor will leave the named value corresponding to the old column in place, and add a new named value with the new column name.
Detecting numbers and dates
If you enter dates or numbers in the data editor, it should produce named values whose formulas are number or date arrays, and not text arrays. That enables them to be acted upon by functions and operators that accept numbers and dates.
To that end, the data editor automatically detects numbers and dates. In order for that to work, the language setting must match the data (which can differ from the language of the app).
Set the language by pressing the button:
Detected numbers appear on a blue background and detected dates appear on a pink background.
Select a range and press the button to force Calcapp to interpret the range as text.
For an example of when this might be useful, consider phone numbers, without hyphens. Calcapp might interpret them as numbers, which is probably not what you want — after all, there is no point in doing arithmetic with phone numbers, and if they have leading zeroes, those should be displayed to a user. As such, they should be interpreted as text.
Likewise, press the button to make Calcapp try to automatically detect if the selected range represents numbers or dates.
Using dedicated screens for data
The data editor creates and works with named values that are part of the current screen. For small tables with a few columns, that can work well.
However, if your tables are large or are used from multiple screens, it’s a good idea to move them to dedicated screens, never shown to your users.
Named values, corresponding to the table with sweaters, dresses and shorts above, could be put on a screen named Products, for instance. That would enable you to reference, say, the Color named value by writing Products!ColorProducts!Color in a formula.
To ensure that your users cannot reach these data screens, there are a few techniques you can use:
- If your app contains a list screen, you can create a navigator that is permanently invisible that leads to the data screens.
- If your app only consists of form screens, put the data screens after the last user-visible form screen. Prevent your users from reaching the data screens using the NextScreenAvailable property of the last user-visible screen.
If you have multiple data screens, create a list screen whose navigators lead to these data screens, and make the list screen itself unreachable using the techniques listed above.
Accessing data from formulas
The named values created from the Products table can easily be used from formulas. This section discusses some commonly-used formulas for processing the data.
If you want to try the formulas on this page for yourself, here’s the data as a Google Sheets spreadsheet.
This formula calculates the average product price:
This formula returns the number of products costing more than $100:
This formula returns the kind of the product costing the most:
This formula returns the color of the product costing $129, “Black”:
To learn how XLOOKUP works, refer to our documentation, which contains many more formula samples.
Using XLOOKUP with multiple criteria
What if we need to use multiple criteria with XLOOKUP, and not just a single one?
Let’s assume that there are three text drop-down fields, named Kind, Size and Color, each containing the values found in the appropriate column in the table.
This formula returns the price of the product matching the selected kind, size and color:
(Kind,
Size and
Color in
the formula refer to the text drop-down fields, whereas names
starting with Products! refer to
named values that are part of the Products screen.)
Let’s repeat the products table here, for easy reference:
| Kind | Size | Color | Price |
|---|---|---|---|
| Sweater | Medium | Blue | 29 |
| Sweater | Large | Blue | 49 |
| Sweater | Large | Purple | 39 |
| Sweater | Small | Purple | 29 |
| Dress | Small | Gray | 69 |
| Dress | Large | Black | 129 |
| Dress | Medium | Blue | 72 |
| Shorts | Medium | Black | 39 |
| Shorts | Large | Black | 52 |
| Shorts | Medium | Gray | 49 |
| Shorts | Large | Purple | 19 |
(Kind = Products!Kind)(Kind = Products!Kind) in the formula above returns a logical array, with a size corresponding to the number of products. Elements that are TRUE indicate that the selected kind (sweater, dress or shorts?) matches the kind found in the table. Elements that are FALSE indicate that there is no match.
To see this, let’s assume that the user selects Sweater from the Kind text drop-down field. If so, (Kind = Products!Kind)(Kind = Products!Kind) returns an array whose first four elements are TRUE, and whose remaining elements are FALSE. That makes sense, as if you look at the data table above, the first four products are sweaters.
(Size = Products!Size)(Size = Products!Size) and (Color = Products!Color)(Color = Products!Color) work similarly.
When they are all put together using &&, a logical array is
returned where TRUE elements indicate that the kind, size and color
are all a match. XLOOKUP is then instructed to find the first TRUE
element in that array, and returns the matching price from the
Products!Price named
value.
To see this even more clearly, read our documentation for XLOOKUP. It contains an example that is similar to this one, but is simpler.
A walk down memory lane
Looking up tabular data has always been possible with Calcapp, but has often been needlessly difficult. Initially, you had to manually convert all data to IF formulas. In 2018, new features made it possible for drop-down fields to access data, which was converted to formulas using an app we wrote.
In 2021, we introduced support for arrays and the XLOOKUP function — which can do everything VLOOKUP and HLOOKUP in Excel can do. We also introduced another app that converts tabular data to formulas, this time using XLOOKUP.
Data from tables still had to awkwardly reside inside all formulas that used them — they couldn’t be stored separately and simply be referenced from other formulas. That led to data being duplicated in many formulas, making it tedious and error-prone to update data.
With the introduction of named values, you can finally store the data separately, making data duplication a thing of the past.
Once we had added support for named values, we saw an opportunity to create a better way to manage tabular data in Calcapp. The end result is the data editor.