Run the BMI calculator app and learn how to install it to your phone’s home screen. Read on to learn how you can create an app just like it, without knowing how to code.
Body mass index (BMI) is a simple way of assessing a person’s height in relation to his or her weight. It is defined as the body weight divided by the square of the body height.
This sample app is a BMI calculator. As can be expected, creating a BMI calculator using Calcapp is straight-forward. To make things more interesting, though, we’ll explore a number of additional features in this blog post, including the ability to select what units to use (US customary units or metric units) and expressing the calculated BMI as a color.
Here’s a screenshot:
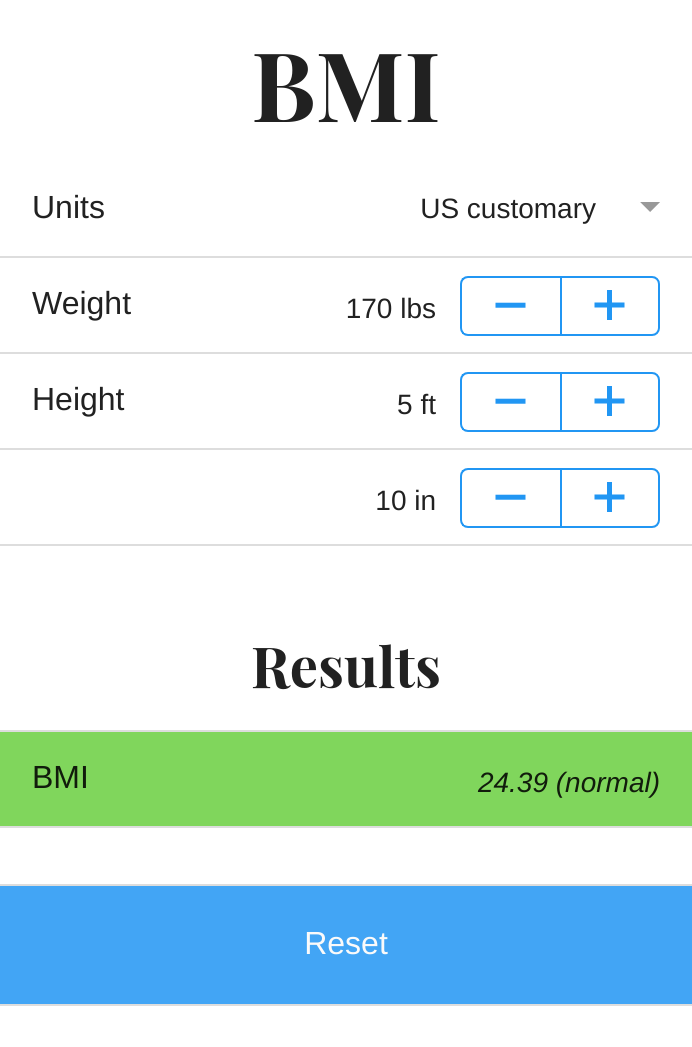
Run the app here. This app is available as the Sample: Body mass index (BMI) template in Calcapp Creator and you are encouraged to experiment with it as you read this blog post.
Selecting the units to use
The first field of the app, Units, is a text drop-down field allowing the user to select what units to use, US customary units (the US customary value) or metric units (the Metric value). Other parts of the app reference this drop-down field to determine what fields to make visible and what calculations to perform.
Entering the weight
Next are two fields, WeightMetric and WeightUs for entering a person’s weight, using US customary and metric units, respectively. Both use steppers to make it easy to experiment with different values. WeightMetric has this formula associated with its Visible property:
Units =
          "Metric"
…and WeightUs has this formula associated with its Visible property:
Units = "US
          customary"
These two formulas ensure that the weight expressed in kilograms is only displayed if the user elects to use metric units and that the weight expressed in pounds is only displayed if the user wants to use US customary units. (To associate a property with a formula, press the fx button displayed next to it in the inspector.)
Next is a hidden field named WeightInKg, which holds the weight in kilograms, regardless of what units the user has opted to work with. (This field is referenced by the field performing the BMI calculation.)
Here’s the formula of the WeightInKg field:
IF(Units = "US
          customary", CONVERT(WeightUs, "lbm", "kg"), WeightMetric)
The IF formula function is used to select a different formula depending on the units selected by the user. If the user opted for US customary units, the CONVERT function is used to do the conversion. Otherwise, the metric value entered by the user is used as-is.
Entering the height
If the user prefers working with metric units, he or she is expected to enter the height in centimeters into the HeightMetric field, which has an associated stepper. As can be expected, the Visible formula of this field reads as follows:
Units =
          "Metric"
Using US customary units, a person’s height is traditionally specified as a height in whole feet, to which a height in whole inches is added. As such, two fields are required to express the height using US customary units, HeightUsFt and HeightUsIn. Both have associated steppers. As one feet is made up of 12 inches, it doesn’t make sense to specify a value for the HeightUsIn field greater than 11, meaning that 11 is set as the maximum value for the stepper.
Both the HeightUsFt and HeightUsIn fields have the following formula associated with their Visible properties:
Units = "US
          customary"
As with the weight, the height is converted to a metric unit using a hidden field, here named HeightInM. It holds the height in meters. Here’s its formula:
IF(Units = "US
          customary", CONVERT(HeightUsFt, "ft", "m") + CONVERT(HeightUsIn,
          "in", "m"), CONVERT(HeightMetric, "cm", "m"))
Again, the CONVERT formula function is used to do the conversion. The converted height in feet is simply added to the converted height in inches if US customary units are used. Otherwise, the entered height in centimeters is converted to meters.
Calculating the results
The results are presented in a different section aptly named Results. This is normally done by creating a new group, which is given a label. Here, though, we have simply added a text box above the fields representing the result. The reason is that text boxes enable us greater control over the appearance, including what fonts to use, their sizes and what text alignment to use.
A hidden field named CalculatedBmi is used to calculate the BMI. Its formula is straight-forward:
WeightInKg /
          HeightInM^2
It references the hidden fields we defined earlier, which hold the
weight in kilograms and the height in meters. The circumflex symbol
(^) should
be read as to the power of and thus denotes exponentiation.
BMI can be used to categorize a person as being underweight, normal, overweight and obese using commonly-accepted ranges. The Category hidden text field uses this formula to determine the category:
IF(CalculatedBmi
          < 18.5, "underweight", IF(CalculatedBmi < 25, "normal",
          IF(CalculatedBmi < 30, "overweight", "obese")))
Finally, the visible text field Bmi joins the calculated BMI value together with the calculated category:
CalculatedBmi.FormattedValue &
          " (" & Category & ")"
FormattedValue denotes
a read-only property by that name belonging to a number field. It
returns a text string representing the formatted value of the number
field (taking into account things like the minimum and maximum number
of decimal places to use). & joins that formatted
value together with an opening parenthesis, the calculated category
and, finally, a closing parenthesis.
The end result is that the calculated BMI is presented as a text string like the following:
25.38 (overweight)
Color-coding the body mass index
The background color of the Bmi field changes to reflect the calculated BMI: blue for underweight, green for normal, yellow for overweight and red for obese.
All colors can be set through formulas, so setting a color for the Bmi field simply involves associating a formula with its BackgroundColor property. A simple of way of achieving our goal would be to use this formula:
IF(Category =
          "underweight", COLOR("Blue 400"), IF(Category = "normal",
          COLOR("Green 400"), IF(Category = "overweight", COLOR("Yellow 400"),
          IF(Category = "obese", COLOR("Red 400")))))
This formula uses four distinct colors depending on the assigned category. It’s simple to reason about, but wouldn’t it be more interesting if the selected color varied using a far greater number of steps? Instead of only using four colors (using a discrete formula), we’ll instead use a potentially infinite number of color variations (using a continuous formula).
To achieve this, we’ll need to use Calcapp’s HSL function. HSL stands for Hue, Saturation, Lightness and enables us to set the hue separately from the saturation and lightness. The hue is given as the first parameter, the saturation as the second parameter and the lightness as the third parameter. The last two parameters should be in the range 0 through 100 and we’ll somewhat arbitrarily choose the number 60 for both of them.
The hue parameter should be in the range 0 through 360 and can be likened to a color wheel. 0 is red, 120 is green, 240 is blue and 360 is (again) red.
To derive the proper hue, we first need to convert the BMI to a ratio, where a BMI of 0 to 18.5 corresponds to the ratio 0 and a BMI of 30 and above corresponds to a ratio of 1.
This is achieved using a hidden field named BmiRatio which uses this formula:
(MIN(30, MAX(18.5,
          CalculatedBmi)) - 18.5) / (30 - 18.5)
The MIN and MAX functions are used to constrain the Bmi value to a value between 18.5 and 30 (inclusive). We then subtract 18.5 from the result and divide the resulting value to arrive at the ratio.
Through experimentation, we determined that a hue value of 210 represents the blue color we want to use for a BMI of 18.5 and a hue value of 0 represents the red color we want to use for a BMI of 30.
The value of the BmiRatio field is 0 for a BMI of 18.5 and 1 for a BMI of 30, though. To achieve what we want, we’ll need to invert the ratio by substracting it from 1. Putting it all together, that enables us to write this formula for the BackgroundColor property of the Bmi field:
HSL((1 - BmiRatio)
          * 210, 60, 60)
Finally, the reset button is grayed-out if there are no values to reset. To achieve this, the following formula is associated with the Enabled property of the button:
ISDEFINED(Bmi)