We boldly claim that action formulas are the biggest addition to Calcapp ever, and that they enable you to create apps that would not have been possible without them. With this new sample app, we put that claim to the test.
There are various online marketplaces that allow you to post products and describe them using text tags, such as eBay. These tags are usually limited not only in terms of how many you can use, but also in terms of their character lengths. It is often to a seller’s benefit to use as many tags as possible, and to put as much information as possible in them.
However, sometimes these online marketplaces offer poor tools for creating and editing tags. With that problem as our inspiration, we set out to create an app that serves as the solution.
The app is embedded below, and this post describes how you use it. It also goes into the nitty-gritty of how it was built and explains all the formulas.
The app uses many new features introduced in this release, principally action formulas, but also three new button types (specifically, clipboard copy buttons, go back buttons and go forward buttons), as well as the new LET function.
You’re encouraged to view the app and its formulas as you read along. It’s available as a template when you create a new app under the Sample: Tag editor name.
Usage
Here’s the app:
You can go straight to the tag editor by pressing I want to create new tags. Here’s what it looks like:
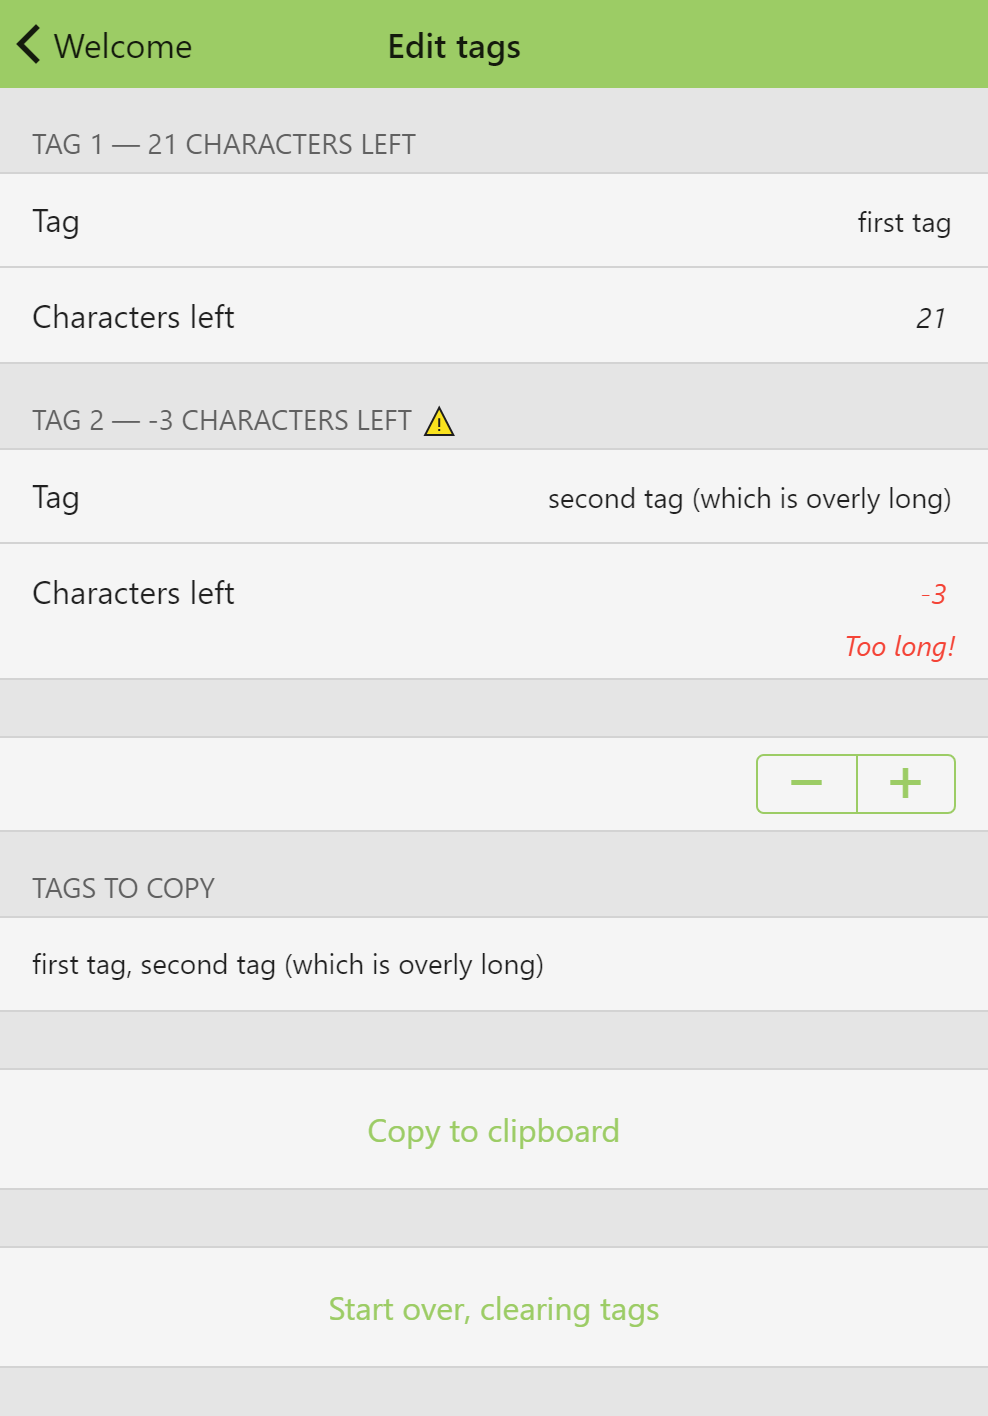
Type tags into the text fields, and be sure to heed the warnings about tags being too long. (The maximum tag length is set to 30 characters.) Press the plus and minus buttons to edit more or fewer tags, respectively.
When you’re satisfied, press the Copy to clipboard button to copy the tags, separated by commas, to the clipboard. That enables them to be easily pasted into the online marketplace.
If you want to edit existing comma-separated tags, press the I want to edit existing tags button. Here’s what that screen looks like:
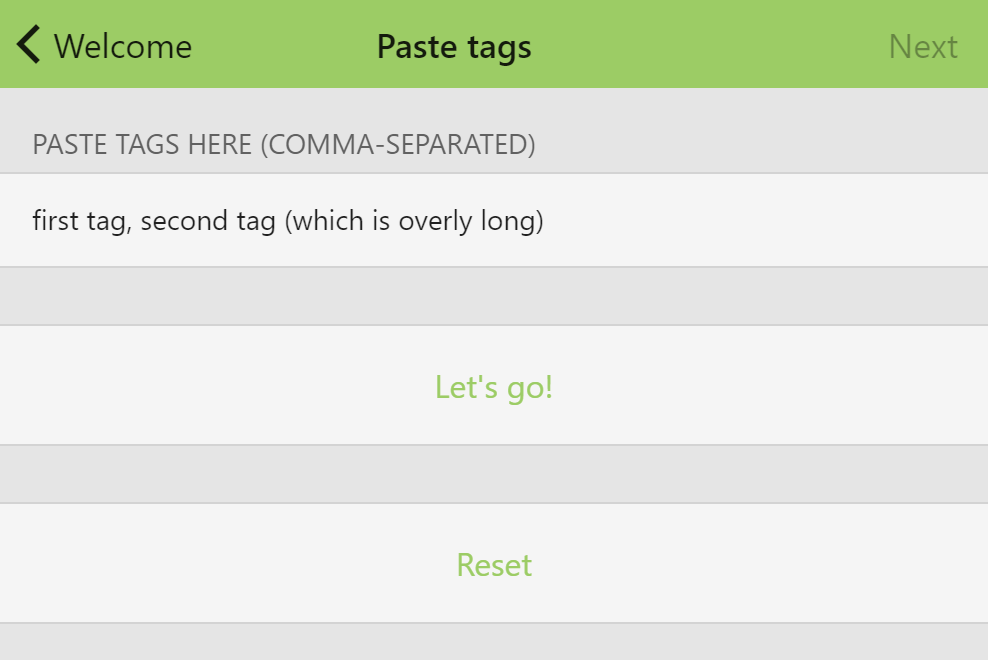
To edit those tags, press the Let’s go! button. You’re then taken to the tag editor, this time with the tags already filled out:

You’ll find that the tag editor looks slightly different. There are new fields that list the original tags that you entered in the preceding step. Those are not editable.
The editable fields are just below the others, and initially contain the tags from the preceding step. You’re welcome to edit those tags, though. This is a good way to tweak your tags, and compare the tweaked tags to the original tags you entered.
Under the hood
The welcome screen
The welcome screen has two buttons that move the user to another screen. The first button takes the user to the screen named PasteTagsScreen, while the second button takes the user to the screen named EditTagsScreen.
For reasons that will become clear later on, we need to keep track of which button the user presses, so we can refer back to it later. To do that, we need the buttons to be formula buttons, so they can run action formulas.
These action formulas do two things: First, they record the decision the user makes. Then, they take the user to a screen corresponding to their choice.
To record the decision the user makes, we’ll add a new hidden text field named
Choice. The first button, that enables the user to edit
existing tags, assigns the text string existing to
Choice, while the second button, which enables the user to
create new tags, assigns the text string new.
This is the formula associated with the OnPress property of the first button:
:= assigns the appropriate value to Choice. Then, the GOFORWARD action function is used to bring the user forward to PasteTagsScreen.
This is the formula associated with the OnPress property of the second button:
Again, := assigns the appropriate value to Choice. Before we change the active screen to EditTagsScreen with GOFORWARD, we also make sure that all the fields of the entire app are reset using the RESET action function.
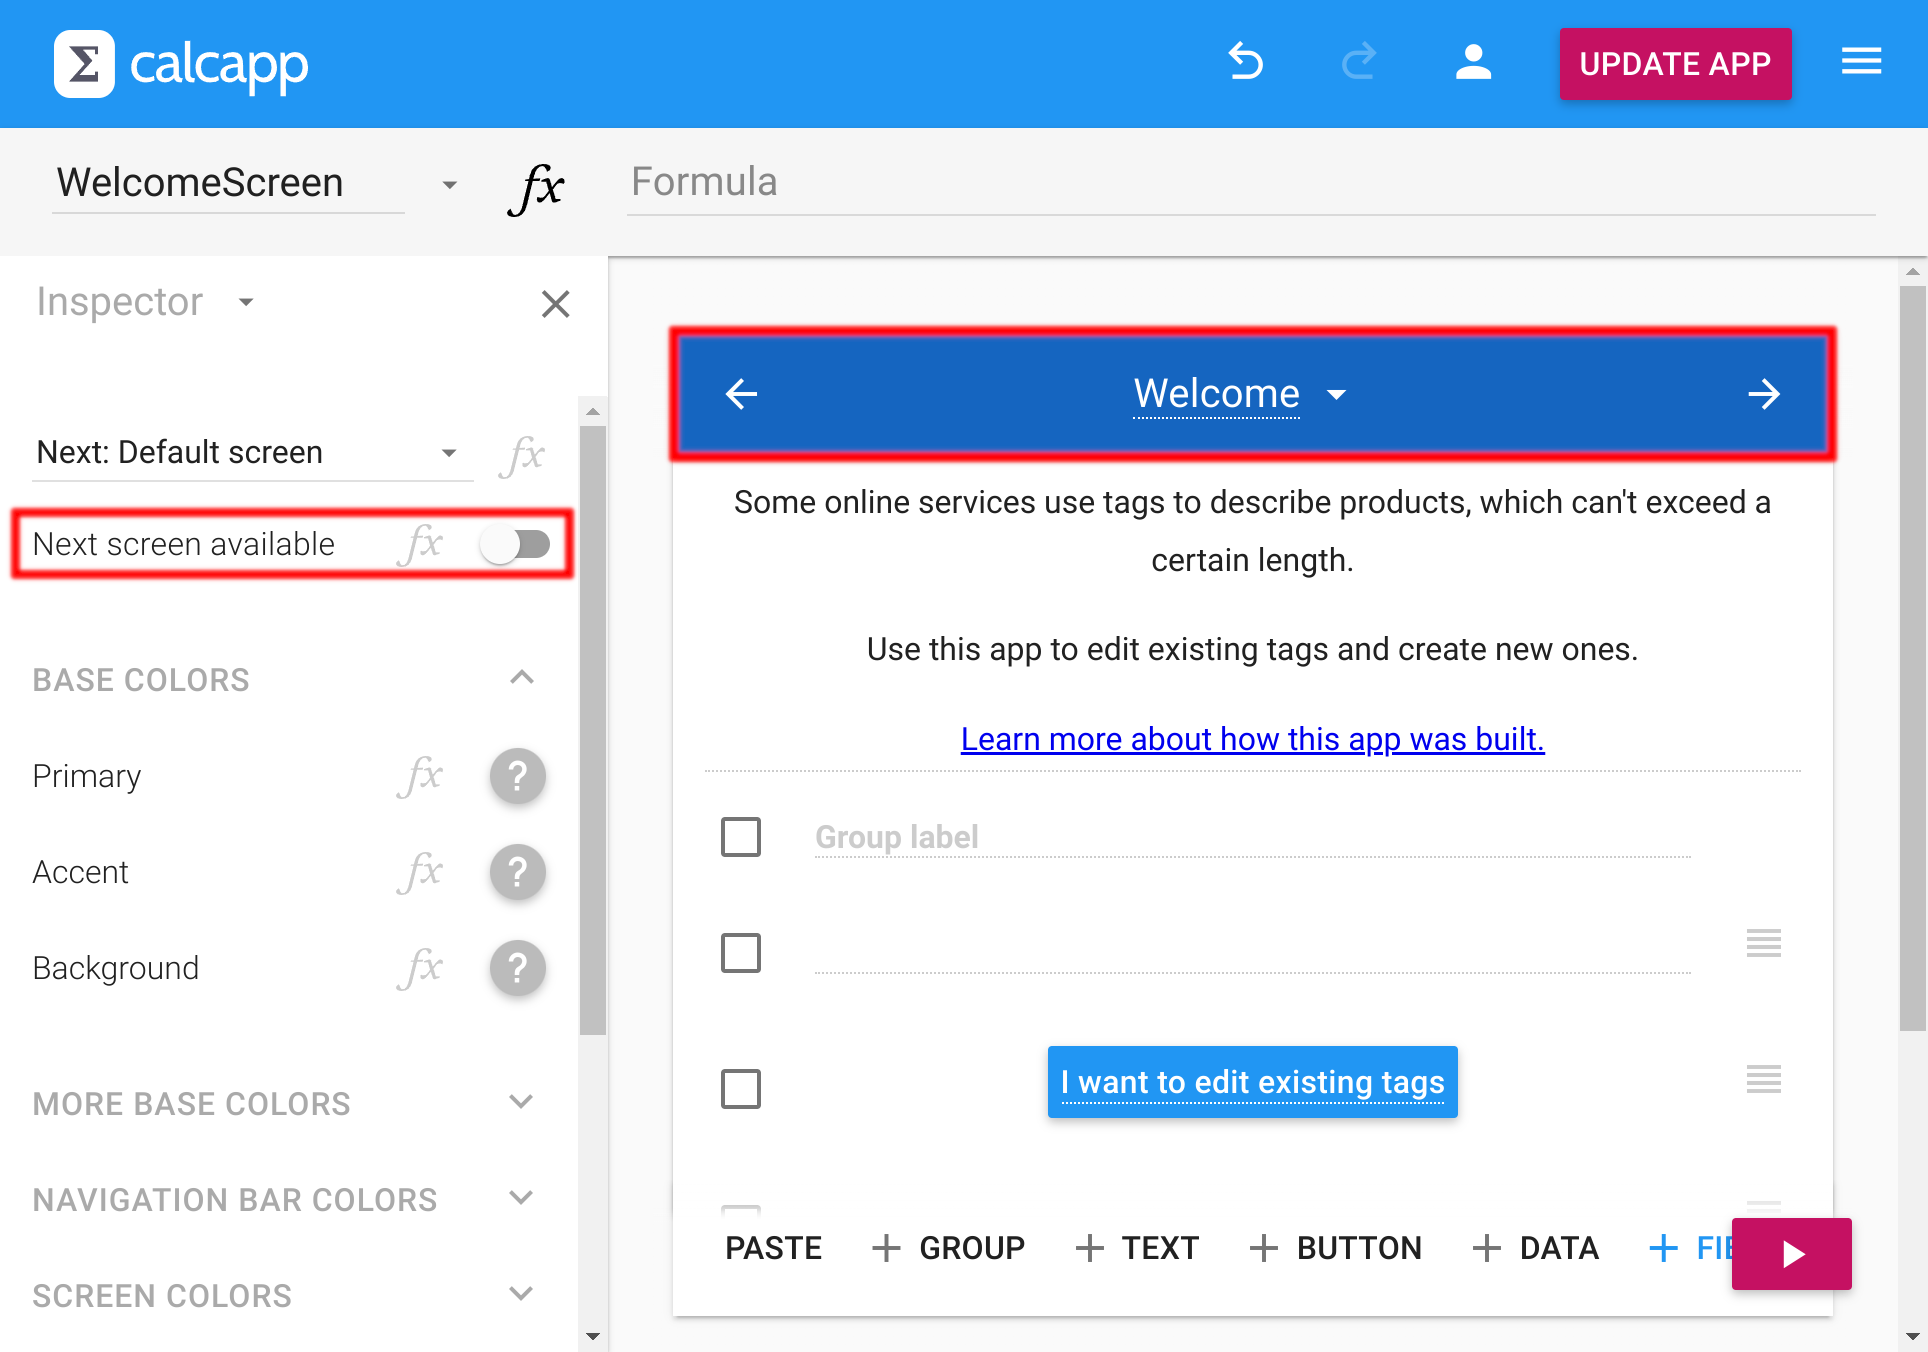
As we only want users to be able to move to other screens through the two buttons, the NextScreenAvailable property of the welcome screen must be toggled to its “off” setting in the inspector.
To select the screen, click anywhere in the blue area at the top of the app. Then, click the toggle next to Next screen available in the inspector. Both areas are marked in this image:
The paste screen
If the user presses the I want to edit existing tags button, they are taken to the screen named PasteTagsScreen. Once there, they can paste tags from their online marketplace.
The screen is simple, with a text field named Tags and a button labeled Let’s go! This button reads the entered tags, populates the screen enabling users to edit tags — EditTagsScreen — and finally moves the user forward to just that screen.
The button is a formula button, and runs an action formula that does what is described above. Here’s the formula:
(The app supports up to ten tags, but for reasons of brevity we’ll pretend that it only supports three tags when reproducing its formulas. Refer to the sample app in Calcapp Creator to see the full formulas.)
The formula above uses the new LET function (which is covered by this blog post). It is used to assign names to values, which can be used in later calculations in the same formula. The formula would have included lots of repeated TEXTSPLIT invocations without LET, which would have made it slower and harder to read.
it assigns the name SplitArray to an array holding the tags entered by the user. If you’re not familiar with arrays, you can think of them as lists of values.
If the Tags text field contains the text string “First tag, Second tag,” the goal is for SplitArray to contain an array equivalent to this formula:
To achieve this, we use the TEXTSPLIT function, which splits apart text strings and returns arrays of text strings, representing the constituent parts of the original text string.
This formula splits apart the value of the Tags text field using a comma as a delimiter:
In other words, all the text that is to the left of the first comma is placed in the first element of the array, the text that is to the right of the first comma, but to the left of the second comma, is placed in the second element, etc.
The TRIM function is invoked on the array returned from TEXTSPLIT, so that space characters that appear before and after the actual tags are removed.
After assigning a value to SplitArray, the formula assigns values to Tag1, Tag2 and Tag3. Here’s the formula fragment used for Tag1:
The SIZE function returns the number of elements in an array. In this context, it returns the number of tags entered by the user in the Tags text field. Tag1 is assigned the first element of SplitArray if there is at least one element in it, otherwise it is given a blank value. Tag2 and Tag3 are similar.
Finally, once Tag1, Tag2 and Tag3 have been given their values, it’s time to use these values to populate the next screen, EditTagsScreen.
The next screen has text fields where tags are entered. For reasons that will become clear in the next section, there are two text fields per tag. For the first tag, these are Original1 and Editable1.
The next order of business is to assign values to both Original1 and Editable1, where both values are equal to the Tag1 value we have created:
Again, the second and third tags are handled similarly.
EditTagsScreen has another field we need to concern ourselves with. TagCount contains the number of visible tags. (Users can press buttons to make more or fewer tags appear.)
If the user has entered three tags in the Tags text field, we want three tags to be visible. To do so, we use this formula fragment:
SplitArray contains the tags entered by the user as an array, and the SIZE function is used to return the number of tags.
We wrap the return value from SIZE using the MAX function to ensure that the lowest number that is returned is 1. The reason is that even if users don’t enter anything in the Tags field, we still want a single tag to be editable on the next screen.
Finally, we use the GOFORWARD function to move the user forward to EditTagsScreen:
The edit tags screen
The edit tags screen consists of three text fields per tag, which are all part of a single form group. The first tag consists of the text fields Original1, Editable1 and CharactersLeft1.
When users reach EditTagsScreen through PasteTagsScreen, all text fields are visible. The first tag read from the Tags text field of PasteTagsScreen is assigned to both the Original1 and Editable1 text fields.
The Original1 text field is always disabled, so that users can compare the tag they are changing to the original. The Editable1 text field is the one that users modify.
When users reach EditTagsScreen directly from the welcome
screen, though, the Original1 field is not visible. To
achieve this, we make use of the fact that we have noted which button
the user pressed, by storing either existing or
new in the
Choice hidden field of the welcome screen.
This formula is associated with the Visible property of Original1:
That means that when users reach this screen directly from the welcome screen, Editable1 is visible, but Original1 is not. The default label of Editable1 is “Editable”, and we’d like it to simply read “Tag” if Original1 is not visible.
To achieve this, we associate this formula with the Label property of Editable1:
The CharactersLeft1 field holds the number of characters that the user may add to the tag without running afoul of the length limits. Here’s its formula:
The MaxCharacters hidden number field holds the value 30. (Feel free to change it to anything you like to suit the online marketplace you’re using, or better yet, enable the user to edit it directly.) The LEN function calculates the length of a text string.
To be extra clear, we modify the label of the form group to hold the same information, along with a warning triangle if there are too many characters in the tag.
Here’s the formula of the Label property of Tag1FormGroup:
It uses the LET function to assign a name to the number of remaining characters. It would have been easier to simply refer to the CharactersLeft1 field, but this way, we can remove those redundant fields in the future, without having to change any other formulas.
The actual label is calculated using &, which is used to join text strings together. A warning triangle is only added if the number of remaining characters is a negative number.
The final bit of business we need to attend to for the first tag is whether it should be visible. There is a field, TagCount, which holds the number of tags to show to the user. There is a stepper associated with that field, enabling users to show more or fewer fields.
To make it work, we associate the following formula with the Visible property of Tag1FormGroup:
(Technically, the first tag is always visible, because a number lower than 1 is never assigned to TagCount. This formula mostly exists for consistency with the other tags.)
That’s it for the first tag! The fields and formulas that realize the other two tags are similar. Refer to the sample app in Calcapp Creator to see how it all comes together.
We’re nearly done! There is a text field, Tags, that brings all tags together, as a comma-separated text string. Here’s its formula:
Again, we use LET to assign names to make the formula easier to read. First, we collect the tags edited by the user as an array. We apply the TRIM function to this array, to ensure that no space characters appear before or after the tags. Finally, we use TEXTJOIN to create a single text string from the array elements, effectively creating a comma-separated text string containing all the tags.
That’s the text string that users should copy to the clipboard, to paste directly into the online marketplace they use.
To make it easy to copy the text string to the clipboard, a clipboard copy button appears directly underneath the text field, whose CopiedText property is set to TagsTags, referencing the text field.
The last item that appears on this screen is a button that allows the user to go back to the previous screen. It also removes the tags entered on PasteTagsScreen.
To achieve this, the button is a formula button, and the following action formula is associated with its OnPress property: